Terraform and OpenTofu are the most common infrastructure-as-code tools used with Tensor9. A Terraform origin stack is a standard Terraform workspace that Tensor9 compiles into customer-specific deployment stacks for each appliance.

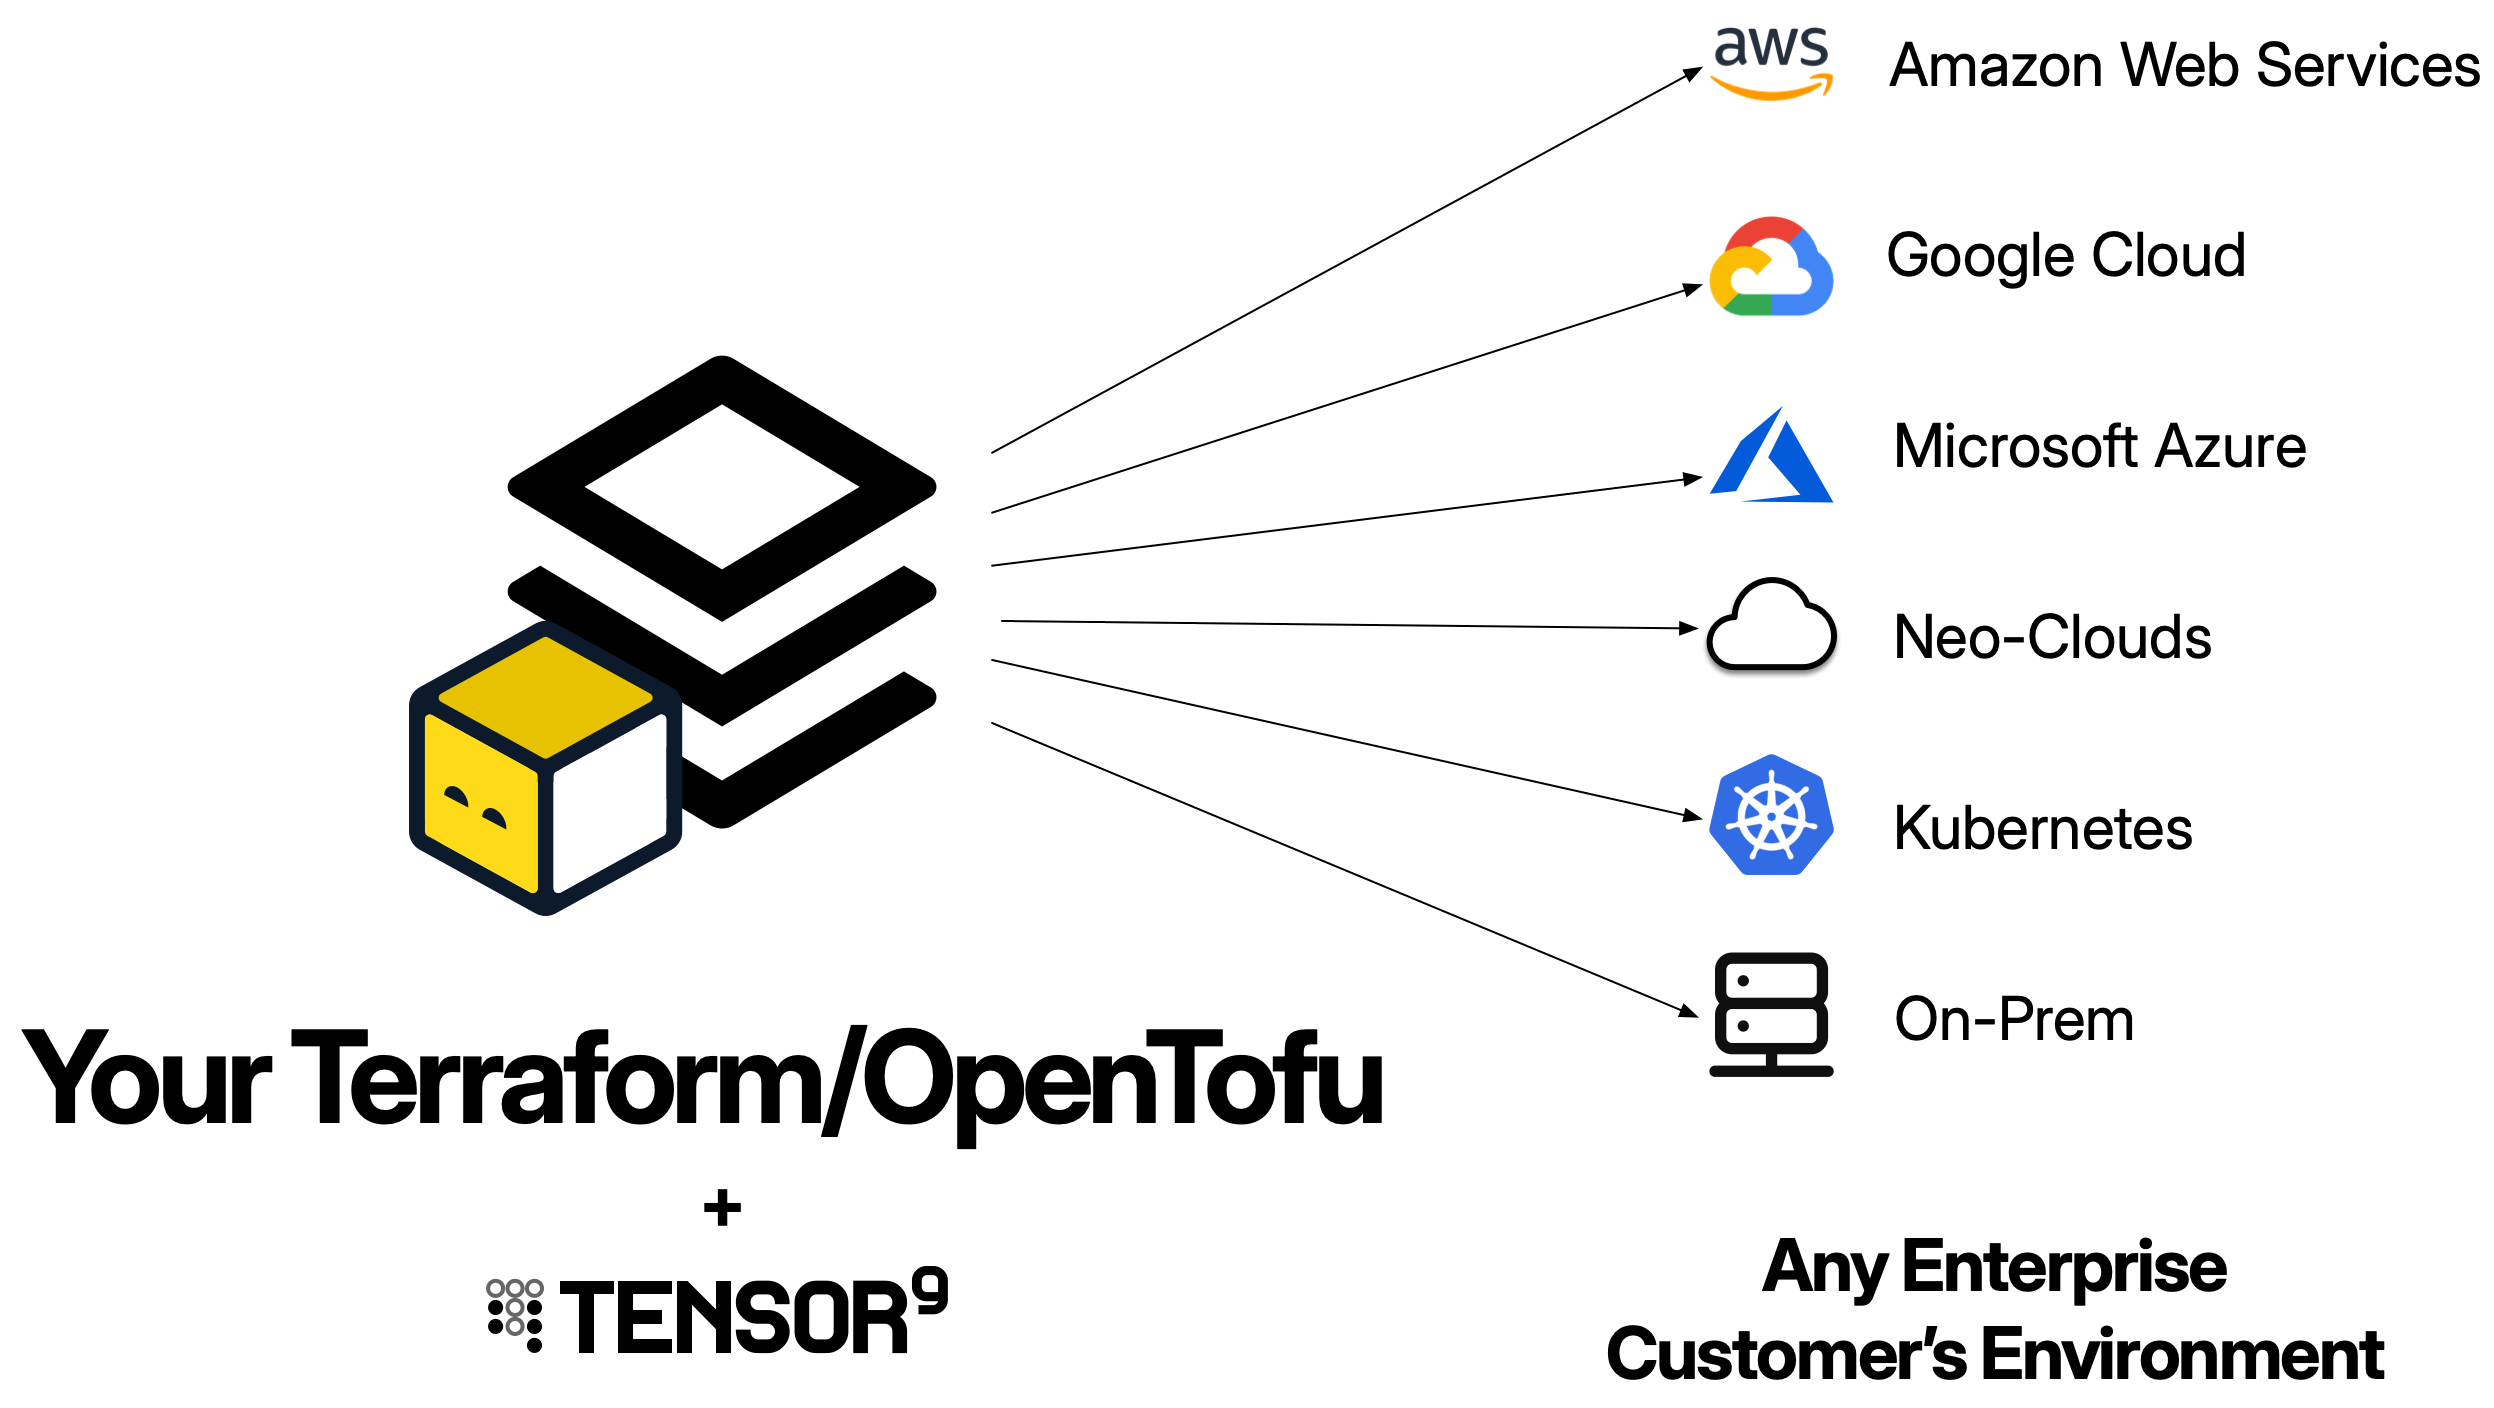
What is a Terraform origin stack?

A Terraform origin stack is your existing Terraform configuration - the .tf files that define your application’s infrastructure. Tensor9 uses this as the blueprint to generate deployment stacks tailored to each customer’s environment. When you publish a Terraform origin stack to Tensor9, your control plane:
  1. Archives your Terraform workspace into a .tf.tgz file
  2. Uploads it to your control plane’s S3 bucket
  3. Uses it as the template for generating deployment stacks for each appliance
The key difference from standard Terraform usage: you maintain one origin stack that Tensor9 compiles into many deployment stacks - one per customer appliance.
Your origin stack should be your existing Terraform configuration. Tensor9 is designed to work with the infrastructure-as-code you already have - you don’t need to write a new stack just for Tensor9. The goal is to maintain a single stack that works for both your SaaS deployment and private customer deployments.

How Terraform origin stacks work

Using Terraform with Tensor9 follows a straightforward workflow:
1

Publish your origin stack

You publish your Terraform workspace to your control plane using tensor9 stack publish. This uploads your .tf files as a compressed archive to your control plane’s S3 bucket.
2

Create a release

When you want to deploy to an appliance, you create a release using tensor9 stack release create. During release creation, your control plane compiles your origin stack into a deployment stack tailored to that specific appliance.The compilation process:
  • Translates cloud-specific resources to match the appliance’s target environment (e.g., AWS RDS → Google Cloud SQL)
  • Injects the instance_id variable to ensure resource uniqueness
  • Instruments the stack for observability (logs, metrics, traces)
  • Rewrites artifact references to point to appliance-local locations
The result is a deployment stack - a new Terraform workspace ready to deploy to that specific appliance.
3

Deploy the deployment stack

Your control plane downloads the compiled deployment stack into a directory named after your appliance. This deployment stack is itself a complete Terraform workspace.You deploy it using standard Terraform commands:For a test appliance:
cd my-test-appliance
tofu init
tofu apply
For a customer appliance:
cd acme-corp-production
tofu init
tofu apply
This creates all the infrastructure resources in the appliance environment.
Key insight: You write and maintain one origin stack. Tensor9 compiles it into many deployment stacks (one per appliance), each customized for that appliance’s target environment. You then deploy each deployment stack using standard tofu apply.

Prerequisites

Before using Terraform as an origin stack, ensure you have:
  • Terraform or OpenTofu installed: Version 1.0+ recommended
  • Valid Terraform configuration: Your configuration must pass tofu validate
  • Tensor9 CLI installed: For publishing your origin stack to your control plane
  • Tensor9 API key configured: Set as T9_API_KEY environment variable
This guide uses the tofu CLI in all examples. If you’re using Terraform instead of OpenTofu, simply replace tofu with terraform in all commands - they work identically.

Structure of a Terraform origin stack

Your Terraform origin stack should follow standard Terraform conventions:
my-app/
├── main.tf              # Main resource definitions
├── variables.tf         # Variable declarations
├── outputs.tf           # Output definitions
├── versions.tf          # Provider version constraints
├── backend.tf           # (Optional) Backend configuration
└── modules/             # (Optional) Local modules
    └── networking/
        ├── main.tf
        └── variables.tf
Tensor9 will archive this entire directory structure when you publish.

Publishing your Terraform origin stack

To make your Terraform configuration available to Tensor9, publish it to your control plane:
tensor9 stack publish \
  -stackType TerraformWorkspace \
  -stackS3Key my-stack \
  -dir /path/to/terraform

What gets published

The tensor9 stack publish command:
  1. Creates a .tf.tgz archive of all .tf files in the specified directory
  2. Uploads the archive to your control plane’s S3 bucket
  3. Returns a native stack ID you’ll use to bind the stack to your app
Example output:
Creating archive of .tf files in /path/to/your/terraform
Uploading /tmp/my-stack.tf.tgz to s3://t9-ctrl-000001/terraform-stacks/origins/my-stack.tf.tgz
Successfully uploaded stack. The native stack ID is s3://t9-ctrl-000001/terraform-stacks/origins/my-stack.tf.tgz

Publishing updates

When you make changes to your Terraform configuration, publish a new version:
# Update your .tf files
# Then publish the new version
tensor9 stack publish \
  -stackType TerraformWorkspace \
  -stackS3Key my-stack \
  -dir /path/to/terraform
The new version becomes available for creating releases. Previously deployed appliances continue running their current version until you create and deploy a new release.

Binding your origin stack to an app

After publishing for the first time, bind your origin stack to your app:
tensor9 stack bind \
  -appName my-app \
  -stackType TerraformWorkspace \
  -nativeStackId s3://t9-ctrl-000001/terraform-stacks/origins/my-stack.tf.tgz
Important: You only need to bind once. Future publishes of the same stack don’t require re-binding.

Parameterization

Parameterization is the process of making your origin stack capable of being deployed to multiple appliances without resource naming conflicts. This is the most critical requirement for a Terraform origin stack in Tensor9.

The instance_id variable

Tensor9 automatically injects an instance_id variable into every deployment to ensure resource uniqueness across appliances. Your origin stack must declare this variable:
variable "instance_id" {
  type        = string
  description = "Uniquely identifies the instance to deploy into"
}
Tensor9 automatically provides this value during compilation - you never need to manually set it.

Using instance_id for resource naming

Use instance_id to make all resource names unique. This prevents conflicts when deploying to multiple customer appliances:
# ✓ CORRECT: Unique per appliance
resource "aws_s3_bucket" "data" {
  bucket = "myapp-data-${var.instance_id}"
}

resource "aws_db_instance" "postgres" {
  identifier = "myapp-db-${var.instance_id}"
}

resource "aws_lambda_function" "api" {
  function_name = "myapp-api-${var.instance_id}"
}

# ✗ INCORRECT: Will cause conflicts across appliances
resource "aws_s3_bucket" "data" {
  bucket = "myapp-data"  # Multiple appliances will try to create the same bucket
}

What to parameterize

Use instance_id for:
  • Resource identifiers: S3 bucket names, RDS identifiers, Lambda function names
  • IAM resources: Role names, policy names
  • Networking: VPC names, subnet tags, security group names
  • Logging: CloudWatch log group names
  • Secret paths: Secret Manager secret names
DNS names are managed automatically: Tensor9 automatically generates DNS names for your appliances using either your vendor vanity domain or the customer’s vanity domain (if they specified one). You don’t need to include instance_id in DNS records. See Endpoints and DNS for details.
Without proper parameterization, attempting to deploy to multiple appliances will result in resource creation failures as Terraform tries to create duplicate resources.

Complete example origin stack

Here’s a complete Terraform origin stack for a typical SaaS application:

main.tf

# Lambda function for API
resource "aws_lambda_function" "api" {
  function_name = "myapp-api-${var.instance_id}"
  handler       = "index.handler"
  runtime       = "nodejs18.x"
  role          = aws_iam_role.api_role.arn
  image_uri     = var.api_image

  environment {
    variables = {
      DB_HOST      = aws_db_instance.postgres.endpoint
      DB_NAME      = aws_db_instance.postgres.db_name
      DB_USER      = aws_db_instance.postgres.username
      BUCKET_NAME  = aws_s3_bucket.data.id
      INSTANCE_ID  = var.instance_id
    }
  }

  tags = {
    "instance-id" = var.instance_id
  }
}

# PostgreSQL database
resource "aws_db_instance" "postgres" {
  identifier        = "myapp-db-${var.instance_id}"
  engine            = "postgres"
  engine_version    = "15.3"
  instance_class    = "db.t3.micro"
  allocated_storage = 20
  db_name           = "myapp"
  username          = "admin"
  password          = var.db_password

  tags = {
    "instance-id" = var.instance_id
  }
}

# S3 bucket for application data
resource "aws_s3_bucket" "data" {
  bucket = "myapp-data-${var.instance_id}"

  tags = {
    "instance-id" = var.instance_id
  }
}

# CloudWatch log group
resource "aws_cloudwatch_log_group" "api_logs" {
  name              = "/aws/lambda/myapp-api-${var.instance_id}"
  retention_in_days = 7

  tags = {
    "instance-id" = var.instance_id
  }
}

# IAM role for Lambda
resource "aws_iam_role" "api_role" {
  name = "myapp-api-role-${var.instance_id}"

  assume_role_policy = jsonencode({
    Version = "2012-10-17"
    Statement = [{
      Action = "sts:AssumeRole"
      Effect = "Allow"
      Principal = {
        Service = "lambda.amazonaws.com"
      }
    }]
  })

  tags = {
    "instance-id" = var.instance_id
  }
}

# IAM policy for Lambda
resource "aws_iam_role_policy" "api_policy" {
  name = "myapp-api-policy-${var.instance_id}"
  role = aws_iam_role.api_role.id

  policy = jsonencode({
    Version = "2012-10-17"
    Statement = [
      {
        Effect = "Allow"
        Action = [
          "s3:GetObject",
          "s3:PutObject"
        ]
        Resource = "${aws_s3_bucket.data.arn}/*"
      },
      {
        Effect = "Allow"
        Action = [
          "logs:CreateLogGroup",
          "logs:CreateLogStream",
          "logs:PutLogEvents"
        ]
        Resource = "arn:aws:logs:*:*:*"
      }
    ]
  })
}

variables.tf

variable "instance_id" {
  type        = string
  description = "Uniquely identifies the instance to deploy into"
}

variable "api_image" {
  type        = string
  description = "Container image for the API Lambda function"
}

variable "db_password" {
  type        = string
  description = "Database password"
  sensitive   = true
}

outputs.tf

output "api_function_arn" {
  description = "ARN of the API Lambda function"
  value       = aws_lambda_function.api.arn
}

output "database_endpoint" {
  description = "Endpoint of the PostgreSQL database"
  value       = aws_db_instance.postgres.endpoint
}

output "data_bucket" {
  description = "Name of the S3 data bucket"
  value       = aws_s3_bucket.data.id
}

versions.tf

terraform {
  required_version = ">= 1.0"

  required_providers {
    aws = {
      source  = "hashicorp/aws"
      version = "~> 5.0"
    }
  }
}

provider "aws" {
  region = "us-west-2"
}

Tagging resources

Tag all resources with instance-id to enable observability and permissions scoping:
resource "aws_s3_bucket" "data" {
  bucket = "myapp-data-${var.instance_id}"

  tags = {
    "instance-id" = var.instance_id
  }
}
This tag allows:
  • Steady-state permissions to filter telemetry by appliance
  • Cost tracking for customers to monitor spending per appliance
  • Resource discovery by Tensor9 controllers

Backend configuration

Tensor9 does not modify backend configuration in your origin stack. You have full control over Terraform state management.

Option 1: Include backend in origin stack

# backend.tf
terraform {
  backend "s3" {
    bucket         = "my-terraform-state"
    key            = "appliances/terraform.tfstate"
    region         = "us-west-2"
    dynamodb_table = "terraform-locks"
  }
}
Backend blocks don’t support variable interpolation: Terraform backend configuration cannot use ${var.instance_id} or other variable references. If you include a backend in your origin stack, use a fixed key path. Tensor9 recommends using Option 2 or 3 below to provide instance-specific state paths at deployment time.

Option 2: Provide backend at deployment time

Don’t include backend.tf in your origin stack. Instead, provide backend configuration when deploying: For a test appliance:
cd my-test-appliance
tofu init \
  -backend-config="bucket=my-terraform-state" \
  -backend-config="key=appliances/test-aws-us-west-2/terraform.tfstate" \
  -backend-config="region=us-west-2"
tofu apply
For a customer appliance:
cd acme-corp-production
tofu init \
  -backend-config="bucket=my-terraform-state" \
  -backend-config="key=appliances/acme-corp-production/terraform.tfstate" \
  -backend-config="region=us-west-2"
tofu apply

Option 3: Add backend after compilation

Create backend.tf in the compiled deployment stack directory before running tofu init: For a test appliance:
cd my-test-appliance
cat > backend.tf <<EOF
terraform {
  backend "s3" {
    bucket = "my-terraform-state"
    key    = "appliances/test-aws-us-west-2/terraform.tfstate"
    region = "us-west-2"
  }
}
EOF
tofu init
tofu apply
For a customer appliance:
cd acme-corp-production
cat > backend.tf <<EOF
terraform {
  backend "s3" {
    bucket = "my-terraform-state"
    key    = "appliances/acme-corp-production/terraform.tfstate"
    region = "us-west-2"
  }
}
EOF
tofu init
tofu apply
See Backend Configuration for more details.

Using modules

Terraform modules work seamlessly with Tensor9. You can use both local and remote modules:

Local modules

# main.tf
module "networking" {
  source = "./modules/networking"

  instance_id = var.instance_id
  vpc_cidr    = "10.0.0.0/16"
}

# modules/networking/main.tf
resource "aws_vpc" "main" {
  cidr_block = var.vpc_cidr

  tags = {
    Name               = "myapp-vpc-${var.instance_id}"
    "instance-id" = var.instance_id
  }
}
Local modules are included in the .tf.tgz archive when you publish.

Remote modules

module "vpc" {
  source  = "terraform-aws-modules/vpc/aws"
  version = "5.0.0"

  name = "myapp-vpc-${var.instance_id}"
  cidr = "10.0.0.0/16"

  tags = {
    "instance-id" = var.instance_id
  }
}
Remote modules are downloaded during tofu init when deploying. Important: Always pass instance_id to modules to ensure resources they create are unique per appliance.

Outputs

Define outputs to expose important values after deployment:
output "api_endpoint" {
  description = "API endpoint URL"
  value       = aws_lambda_function_url.api.function_url
}

output "database_endpoint" {
  description = "Database connection endpoint"
  value       = aws_db_instance.postgres.endpoint
  sensitive   = true
}
After deployment, view outputs using tofu output:
cd acme-corp-production
tofu output
Example output:
api_endpoint = "https://api.acme-corp-production.my-app.customer.com"
database_endpoint = <sensitive>
data_bucket = "myapp-data-000000000000007e"
Outputs are also visible in tensor9 report:
tensor9 report
Example from tensor9 report:
Customer Appliance: acme-corp-production [id: 000000000000007e]:
    ...
    Installs:
        Acme Software/my-app → Acme Corp
            ...
            Outputs:
                api_endpoint: https://api.acme-corp-production.my-app.customer.com
                data_bucket: myapp-data-000000000000007e

Service equivalents

When you create a release for an appliance, Tensor9 compiles your origin stack by replacing AWS-specific resources with their equivalents in the target environment. Example: AWS to Google Cloud Origin stack (AWS):
resource "aws_db_instance" "postgres" {
  identifier     = "myapp-db-${var.instance_id}"
  engine         = "postgres"
  instance_class = "db.t3.micro"
}

resource "aws_s3_bucket" "data" {
  bucket = "myapp-data-${var.instance_id}"
}
Deployment stack (compiled for Google Cloud):
resource "google_sql_database_instance" "postgres" {
  name             = "myapp-db-${var.instance_id}"
  database_version = "POSTGRES_15"
  tier             = "db-f1-micro"
}

resource "google_storage_bucket" "data" {
  name     = "myapp-data-${var.instance_id}"
  location = "US"
}
See Service Equivalents for details on which services are supported and how they’re mapped.

Best practices

Every resource that has a name, identifier, or globally unique value should include instance_id:
# ✓ CORRECT
resource "aws_s3_bucket" "data" {
  bucket = "myapp-data-${var.instance_id}"
}

resource "aws_iam_role" "api" {
  name = "myapp-api-${var.instance_id}"
}

# ✗ INCORRECT - Will cause collisions
resource "aws_s3_bucket" "data" {
  bucket = "myapp-data"
}
Without instance_id, deploying to multiple appliances will fail due to resource naming conflicts.
Tag every resource with instance-id:
tags = {
  "instance-id" = var.instance_id
}
This enables:
  • Observability permissions scoping
  • Cost tracking per appliance
  • Resource discovery
Define outputs for values that operators or other systems need to access:
output "api_endpoint" {
  value = aws_lambda_function_url.api.function_url
}
These appear in tensor9 report and tofu output.
Always validate your Terraform configuration before publishing:
cd /path/to/terraform
tofu init
tofu validate
This catches syntax errors and missing variables early.
Never deploy directly to customer appliances without testing:
  1. Publish your origin stack
  2. Create a release for a test appliance
  3. Deploy and validate
  4. Then create releases for customer appliances
See Testing for details.
Pin provider versions to avoid unexpected changes:
terraform {
  required_providers {
    aws = {
      source  = "hashicorp/aws"
      version = "~> 5.0"
    }
  }
}
This ensures consistent behavior across deployments.
For large applications, use modules to organize resources:
my-app/
├── main.tf
├── variables.tf
├── outputs.tf
└── modules/
    ├── api/
    ├── database/
    └── networking/
This improves maintainability and reusability.

Troubleshooting

Symptom: tensor9 stack publish fails with validation errors.Solutions:
  • Run tofu validate locally to identify syntax errors
  • Ensure all required variables are declared
  • Check that all referenced resources exist
  • Verify provider versions are compatible
Symptom: Release creation fails because a resource type isn’t in the service equivalents registry.Solutions:
  • Check if the resource is supported in your target form factor
  • Use a more generic resource type if available
  • Contact Tensor9 support to request support for the resource type
Symptom: tofu apply fails with “resource already exists” errors.Solutions:
  • Ensure all resource names include ${var.instance_id}
  • Check that you’re not hard-coding any globally unique identifiers
  • Verify the instance_id variable is declared in variables.tf
Symptom: tofu init fails with backend errors or state is not found.Solutions:
  • Verify backend configuration is correct
  • Ensure state bucket exists and is accessible
  • Check that backend configuration includes ${var.instance_id} for unique state paths
  • See Backend Configuration

Next steps

Now that you understand Terraform origin stacks, explore these topics: