
What is a Docker container origin stack?
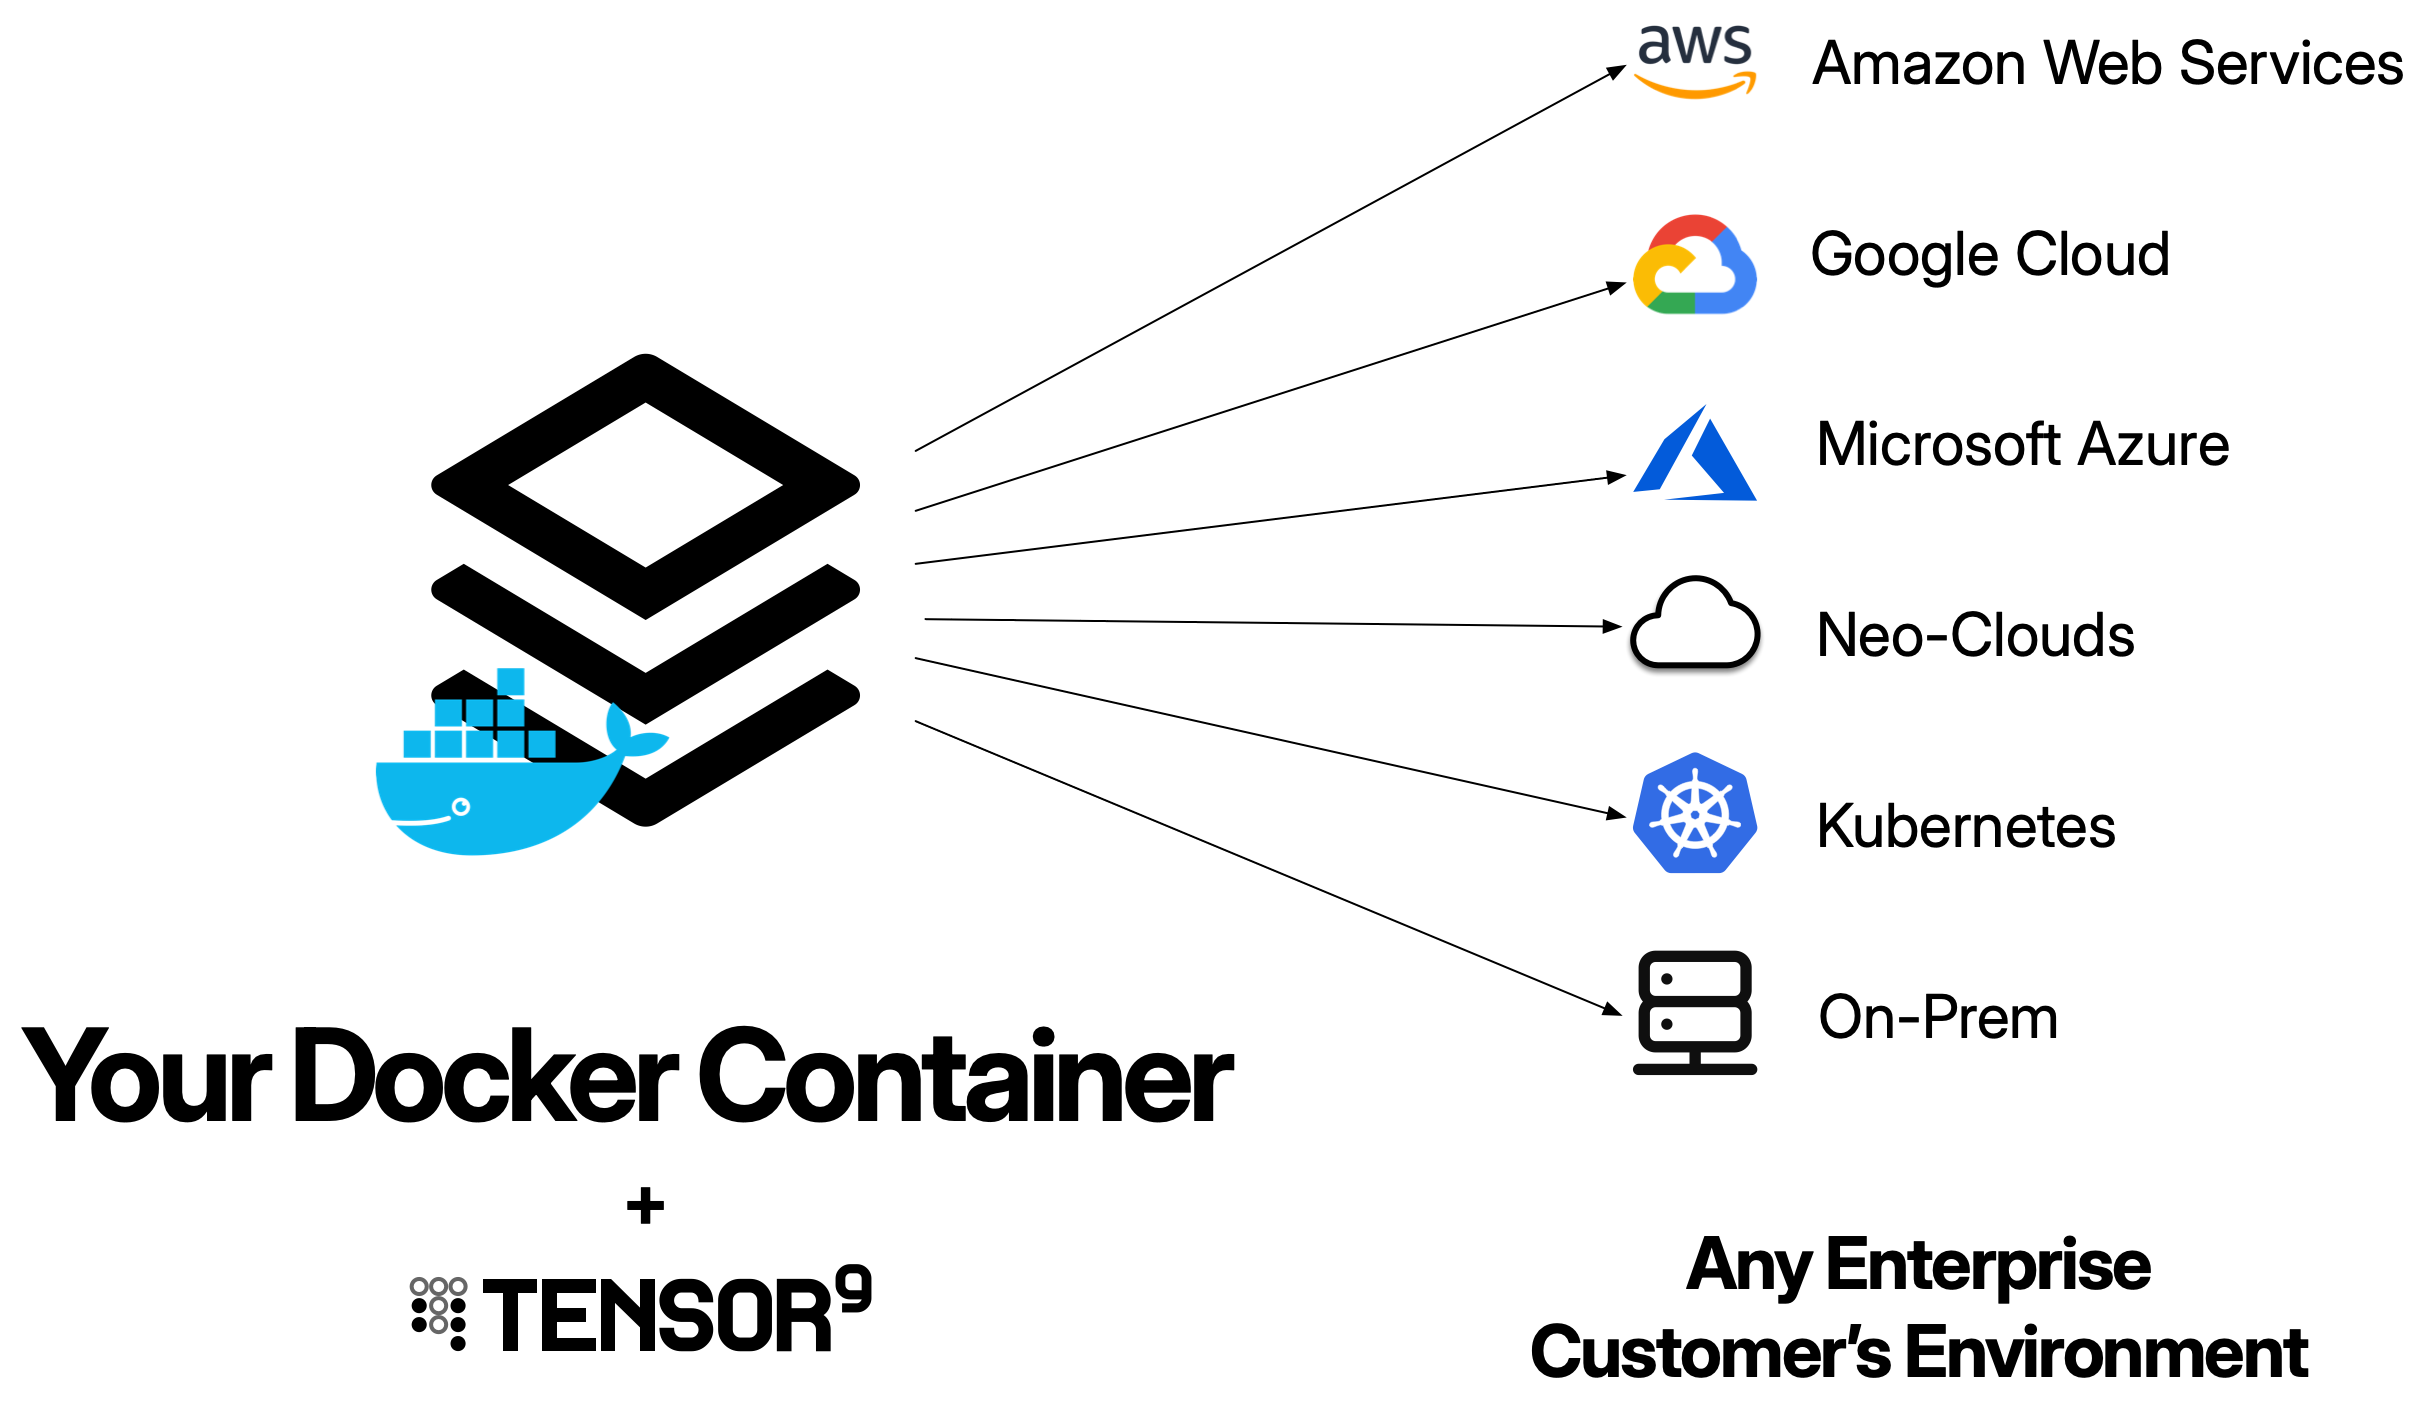
A Docker container origin stack is your existing Docker container image. Tensor9 takes your container image URI and automatically generates all the necessary infrastructure (container orchestration, networking, load balancers) to run it in customer environments - whether that’s AWS, Google Cloud, Azure, DigitalOcean, or private Kubernetes clusters. Tensor9 reads your container image metadata directly from the image. If your container includesEXPOSE directives, Tensor9 automatically configures load balancers for those ports. You simply bind your app to the container image URI, and Tensor9 uses this as the blueprint to generate complete deployment stacks for each customer appliance.
Your origin stack should be your existing Docker container. Tensor9 is designed to work with the container images you already have - you don’t need to rebuild your containers just for Tensor9. The goal is to maintain a single container image that works for both your SaaS deployment and private customer deployments.
How Docker container origin stacks work
1
Publish your container image
Your container image must be available in a container registry (Amazon ECR, Docker Hub, GitHub Container Registry, Google Artifact Registry, etc.). Tensor9 will reference this image when creating deployment stacks.
2
Create a release
When you want to deploy to an appliance, you create a release using
The compilation process:
tensor9 stack release create. During release creation, your control plane compiles your Docker container specification into a complete Terraform deployment stack tailored to the appliance’s cloud environment.The compilation generates different infrastructure based on the appliance’s form factor:| Form Factor | Generated Infrastructure |
|---|---|
| AWS | - ECS Fargate cluster, task definition, and service - VPC with subnets, internet gateway, and route tables - Network load balancer with listeners and target groups for each exposed port - Security groups with ingress rules for exposed ports - IAM roles with appropriate permissions - CloudWatch log groups for container logs |
| Google Cloud | - Cloud Run service or Compute Engine instance group - VPC network and firewall rules - Load balancer with backend services for each exposed port - Service accounts with appropriate permissions - Cloud Logging configuration |
| Azure | - Container Instances or Azure Kubernetes Service - Virtual network and network security groups - Load balancer with rules for each exposed port - Managed identities with appropriate permissions - Azure Monitor configuration |
| DigitalOcean | - Kubernetes Deployment and Service resources - Load balancer configuration for each exposed port - Network policies |
| Private Kubernetes | - Kubernetes Deployment with pod specifications - Kubernetes Service (LoadBalancer or NodePort) for each exposed port - Resource requests and limits |
- Automatically creates appropriate load balancing resources for each exposed port
- Configures routing to your container based on the cloud provider
- Sets up security rules to allow inbound traffic on exposed ports
- Maps container ports to load balancer ports
- Configures the container orchestration system to run your container
3
Deploy the deployment stack
Download the compiled deployment stack and deploy it using Terraform or OpenTofu:The Terraform deployment creates all the infrastructure resources (container orchestration, load balancer, networking, etc.) automatically and starts your container.
4
Monitor deployment progress
Monitor the deployment using Terraform output and your cloud provider’s console:
You maintain one container image. Tensor9 compiles it into many deployment stacks (one per appliance), each customized for that appliance’s cloud environment. Each deployment stack is a Terraform configuration that creates the appropriate infrastructure for the target cloud provider.
Prerequisites
Before using Docker as an origin stack, ensure you have:- Container image in a registry: Your image must be pushed to a container registry (the deployment stack will copy it to the appliance’s registry)
- Tensor9 CLI installed: For creating releases
- Tensor9 API key configured: Set as
T9_API_KEYenvironment variable
Docker container origin stack format
A Docker container origin stack is simply your container image URI:EXPOSE directives, Tensor9 automatically configures load balancers for those ports.
Publishing workflow: You bind your app to a container image URI (typically with the
:latest tag). Then, each time you want to release a new version, you simply push a new container image to that same tag. Tensor9 will pull the latest image when you create a release. This means you don’t need to rebind your app every time you update your container - just push the new image and create a release.Supported registries
Your container image can be in any container registry:- Amazon ECR:
123456789.dkr.ecr.us-west-2.amazonaws.com/my-app:latest - Docker Hub:
docker.io/library/nginx:latest - GitHub Container Registry:
ghcr.io/myorg/app:latest - Google Artifact Registry:
us-docker.pkg.dev/project/repo/image:latest - Azure Container Registry:
myregistry.azurecr.io/app:latest - Private registries: Any OCI-compatible registry
Exposed ports (optional)
If your container image includesEXPOSE directives, Tensor9 will automatically configure load balancers for those ports. For example, if your Dockerfile contains:
- Create a load balancer listener for each exposed port
- Configure routing from the load balancer to your container
- Set up security rules to allow inbound traffic on exposed ports
- Map container ports to external load balancer ports
EXPOSE directives, Tensor9 will deploy the container without a load balancer.
Currently, only TCP ports are supported. UDP and other protocols are not yet supported for Docker container origin stacks.
Publishing and deploying
Initial setup (one-time)
1
Build and push your container image
Build your origin Docker image and push it to a registry:
2
Bind the container image to your app
Bind your app to the container image URI:This only needs to be done once per app.
Releasing new versions
Each time you want to release a new version:1
Push your updated container image
2
Create a release
3
Deploy to your test appliance
Download and deploy the compiled deployment stack:
4
Access your application
Once deployed, you can access your application through the load balancer endpoint. The exact method depends on the cloud provider:Your application will be accessible at the endpoint shown, on each exposed port.
Tuning container resources
You can customize the CPU and memory resources allocated to your container by providing a stack tuning document when creating a release. This allows you to adjust resources per deployment without modifying your origin stack.Creating a stack tuning document
Create a JSON or YAML file that specifies the container resources:- Whole numbers:
"2"(2 CPUs) - Millicores:
"2000m"(2000 millicores = 2 CPUs) - Fractional:
"0.5"(half a CPU)
- Gibibytes:
"4Gi"(4 GiB) - Gigabytes:
"4G"(4 GB) - Mebibytes:
"4096Mi"(4096 MiB) - Megabytes:
"4096M"(4096 MB)
Using the stack tuning document
Pass the stack tuning document when creating a release:When to use resource tuning
Resource tuning is useful when:- Different customer tiers: Allocate more resources for enterprise customers
- Performance optimization: Increase resources for high-load deployments
- Cost optimization: Reduce resources for development/testing environments
- Workload requirements: Match resources to specific customer workload patterns
The stack tuning document overrides the default resource allocation for that specific release. You can use different stack tuning documents for different appliances, allowing you to customize resources per customer without changing your origin stack.
Managing secrets
Pass sensitive data to your container as environment variables using secrets defined in the tuning document. This allows you to reference secrets from AWS Secrets Manager or SSM Parameter Store.Defining secrets in the tuning document
Add asecrets section to your tuning document:
Accessing secrets in your application
Your application reads secrets from environment variables:Pass secrets as environment variables rather than using runtime SDK calls. While
boto3.client('secretsmanager').get_secret_value() works natively in AWS appliances, using environment variables ensures your application works consistently across all deployment targets (AWS, Google Cloud, DigitalOcean).Exposing ports
Tensor9 detects which ports your container exposes by reading theEXPOSE directives in your Dockerfile. When ports are detected, Tensor9 automatically provisions cloud-native load balancers to route traffic to your container.
Defining exposed ports in your Dockerfile
Use theEXPOSE directive in your Dockerfile to declare which ports your application listens on:
How Tensor9 provisions load balancers
When Tensor9 detectsEXPOSE directives in your container image, it creates infrastructure appropriate for each cloud provider:
| Environment | Container Orchestration | Load Balancer | Configuration |
|---|---|---|---|
| Kubernetes-based (DigitalOcean, Private Kubernetes) | Kubernetes Deployment | Kubernetes LoadBalancer Service | Service with a port for each exposed port; cloud provider automatically provisions load balancer |
| AWS | ECS Fargate Service | Network Load Balancer (NLB) | Target groups and listeners for each exposed port |
| Google Cloud | Cloud Run service or Compute Engine | Cloud Load Balancing or Cloud Run | Backend services for each exposed port (TCP) or automatic HTTPS routing (Cloud Run) |
| Azure | Container Instances or AKS | Azure Load Balancer | Backend pools and rules for each exposed port |
Accessing your exposed ports
After deployment, retrieve the public endpoint from the cloud provider: For Kubernetes-based environments:http://<EXTERNAL-IP>:8080 and https://<EXTERNAL-IP>:8443.
For AWS ECS:
http://my-app-nlb-123456.elb.us-east-1.amazonaws.com:8080.
For Google Cloud Run:
Multiple ports
Expose multiple ports for different purposes by adding multipleEXPOSE directives:
EXPOSE directive creates a corresponding listener/target group on the load balancer.
Protocol support
Supported:- Standard TCP ports (HTTP, HTTPS, custom TCP services)
- Multiple ports per container
- Ports in any range (1-65535)
- UDP protocols (only TCP is supported)
- Port range specifications in EXPOSE (e.g.,
EXPOSE 8000-8010) - SCTP or other non-TCP protocols
Best practices for ports
Use standard ports for common protocols:- Each exposed port may incur load balancer costs
- Only expose ports that need external access from outside the appliance
- Use a single port with path-based routing when possible
0.0.0.0 (all network interfaces), not localhost or 127.0.0.1:
- For complex routing needs
- To consolidate multiple services behind a single endpoint
- To reduce load balancer costs
Internal-only containers
If your container doesn’t need external access (e.g., background workers, queue processors), don’t include anyEXPOSE directives in your Dockerfile:
Generated infrastructure by form factor
When Tensor9 compiles your Docker container origin stack, it generates infrastructure appropriate for the target cloud provider:| Infrastructure | AWS | Google Cloud | Azure | DigitalOcean | Private Kubernetes |
|---|---|---|---|---|---|
| Container Orchestration | ECS Cluster ECS Task Definition with resource limits ECS Service (1 replica) | Cloud Run service with automatic scaling Configured resource limits | Container Instances or AKS cluster Configured resource limits | Kubernetes Deployment Resource requests and limits 1 replica | Kubernetes Deployment Resource requests and limits 1 replica |
| Networking | VPC with public subnets Internet Gateway and route tables Security groups for exposed ports | VPC network with subnet Firewall rules for exposed ports Cloud NAT for outbound connectivity | Virtual network and subnet Network security groups for exposed ports | Kubernetes Service (LoadBalancer) Network policies | Kubernetes Service (LoadBalancer or NodePort) Service ports for exposed ports |
| Load Balancing | Network Load Balancer Target groups per exposed port Listeners per exposed port | Cloud Load Balancer (HTTP(S) or TCP) Backend services per exposed port URL maps and forwarding rules | Azure Load Balancer or Application Gateway Backend pools per exposed port Rules per exposed port | DigitalOcean Load Balancer (auto-provisioned) Service ports per exposed port | Service endpoint (LoadBalancer or NodePort) |
| Security & Logging | IAM task execution role and task role CloudWatch log group (90-day retention) | Service account with permissions Cloud Logging configuration | Managed identity with permissions Azure Monitor and Log Analytics workspace | Standard Kubernetes RBAC Container logs | Standard Kubernetes RBAC Container logs |
| Container Registry | Amazon ECR in appliance’s AWS account | Google Artifact Registry in appliance’s GCP project | Azure Container Registry in appliance’s Azure subscription | DigitalOcean Container Registry in appliance’s DO account | Appliance-local container registry (bundled with appliance) |
Best practices
Use the :latest tag for simplicity
Use the :latest tag for simplicity
For Docker container origin stacks, use the
:latest tag (or another consistent tag) and push updates to the same tag. This allows you to release new versions by simply pushing a new image and creating a release, without needing to rebind your app. Tensor9’s vendorVersion field in releases provides version tracking.Use Terraform for multi-container deployments
Use Terraform for multi-container deployments
Docker container origin stacks support a single container per deployment. If your application requires multiple containers (sidecars, service meshes, separate frontend/backend, caching layers, etc.), use a Terraform origin stack instead. Terraform allows you to define complex multi-container architectures using Kubernetes Deployments or ECS task definitions with multiple container specifications.
Use Terraform for advanced tunability
Use Terraform for advanced tunability
While Docker container origin stacks provide simple resource tuning via stack tuning documents, use a Terraform origin stack if you need advanced configuration options like auto-scaling policies, custom health check intervals, placement constraints, capacity providers, or fine-grained networking controls. Terraform gives you full control over infrastructure parameters that Docker container origin stacks don’t expose.
Limitations and considerations
TCP ports only
TCP ports only
Currently, only TCP ports are supported for exposed ports. UDP, SCTP, and other protocols are not yet supported. If your application requires non-TCP protocols, consider using Kubernetes resources embedded in Terraform as your origin stack.
Customizable container resources
Customizable container resources
Docker container origin stacks deploy with default resource limits, but you can customize CPU and memory using a stack tuning document (see “Tuning container resources” section above). For more complex resource configurations or different resource types (GPU, ephemeral storage), use Terraform or CloudFormation to define your container infrastructure directly.
Single container per deployment
Single container per deployment
Docker container origin stacks support a single container. If you need multi-container deployments (sidecars, service meshes, init containers), embed Kubernetes Deployment resources in a Terraform origin stack instead.
Troubleshooting
Container fails to start
Container fails to start
Symptom: Container orchestration system shows unhealthy or continuously restarting containers.Cause: Container image not found, incorrect exposed ports, or application crashes on startup.Solution:
- Verify the container image exists in the registry
- Check that exposed ports match what your application listens on
- View container logs:
tensor9 report -customerName acme-corp - Test the container locally:
docker run -p 8080:8080 your-image - For Kubernetes: Use
kubectl logsandkubectl describe podto diagnose - For cloud services: Check the cloud provider’s console for detailed error messages
Cannot access application through load balancer
Cannot access application through load balancer
Symptom: Load balancer endpoint resolves but connection times out or is refused.Cause: Security rules not configured correctly, or application not listening on the right port.Solution:
- Verify the
EXPOSEdirectives in your Dockerfile match the ports your application listens on - Check security group/firewall rules allow inbound traffic on exposed ports
- Confirm your application binds to
0.0.0.0(all interfaces) notlocalhostor127.0.0.1 - Check health check status in the cloud provider’s console
- For Kubernetes: Use
kubectl port-forwardto test direct connectivity to the pod
Image pull errors
Image pull errors
Symptom: Container orchestration fails with image pull errors.Cause: Image doesn’t exist, registry is unreachable, or authentication issues.Solution:
- Verify the image exists:
docker pull your-image - Ensure the image is in a publicly accessible registry or properly authenticated
- Check that the registry is accessible from the appliance’s cloud environment
- For private registries, verify that registry credentials are configured correctly
- Review the cloud provider’s logging for detailed error messages about the pull failure
Related topics
- Terraform: For custom container infrastructure or multi-container deployments
- Kubernetes: For embedding Kubernetes resources in Terraform
- Deployments: How to create releases and deploy
- Form Factors: Understand different cloud environments