
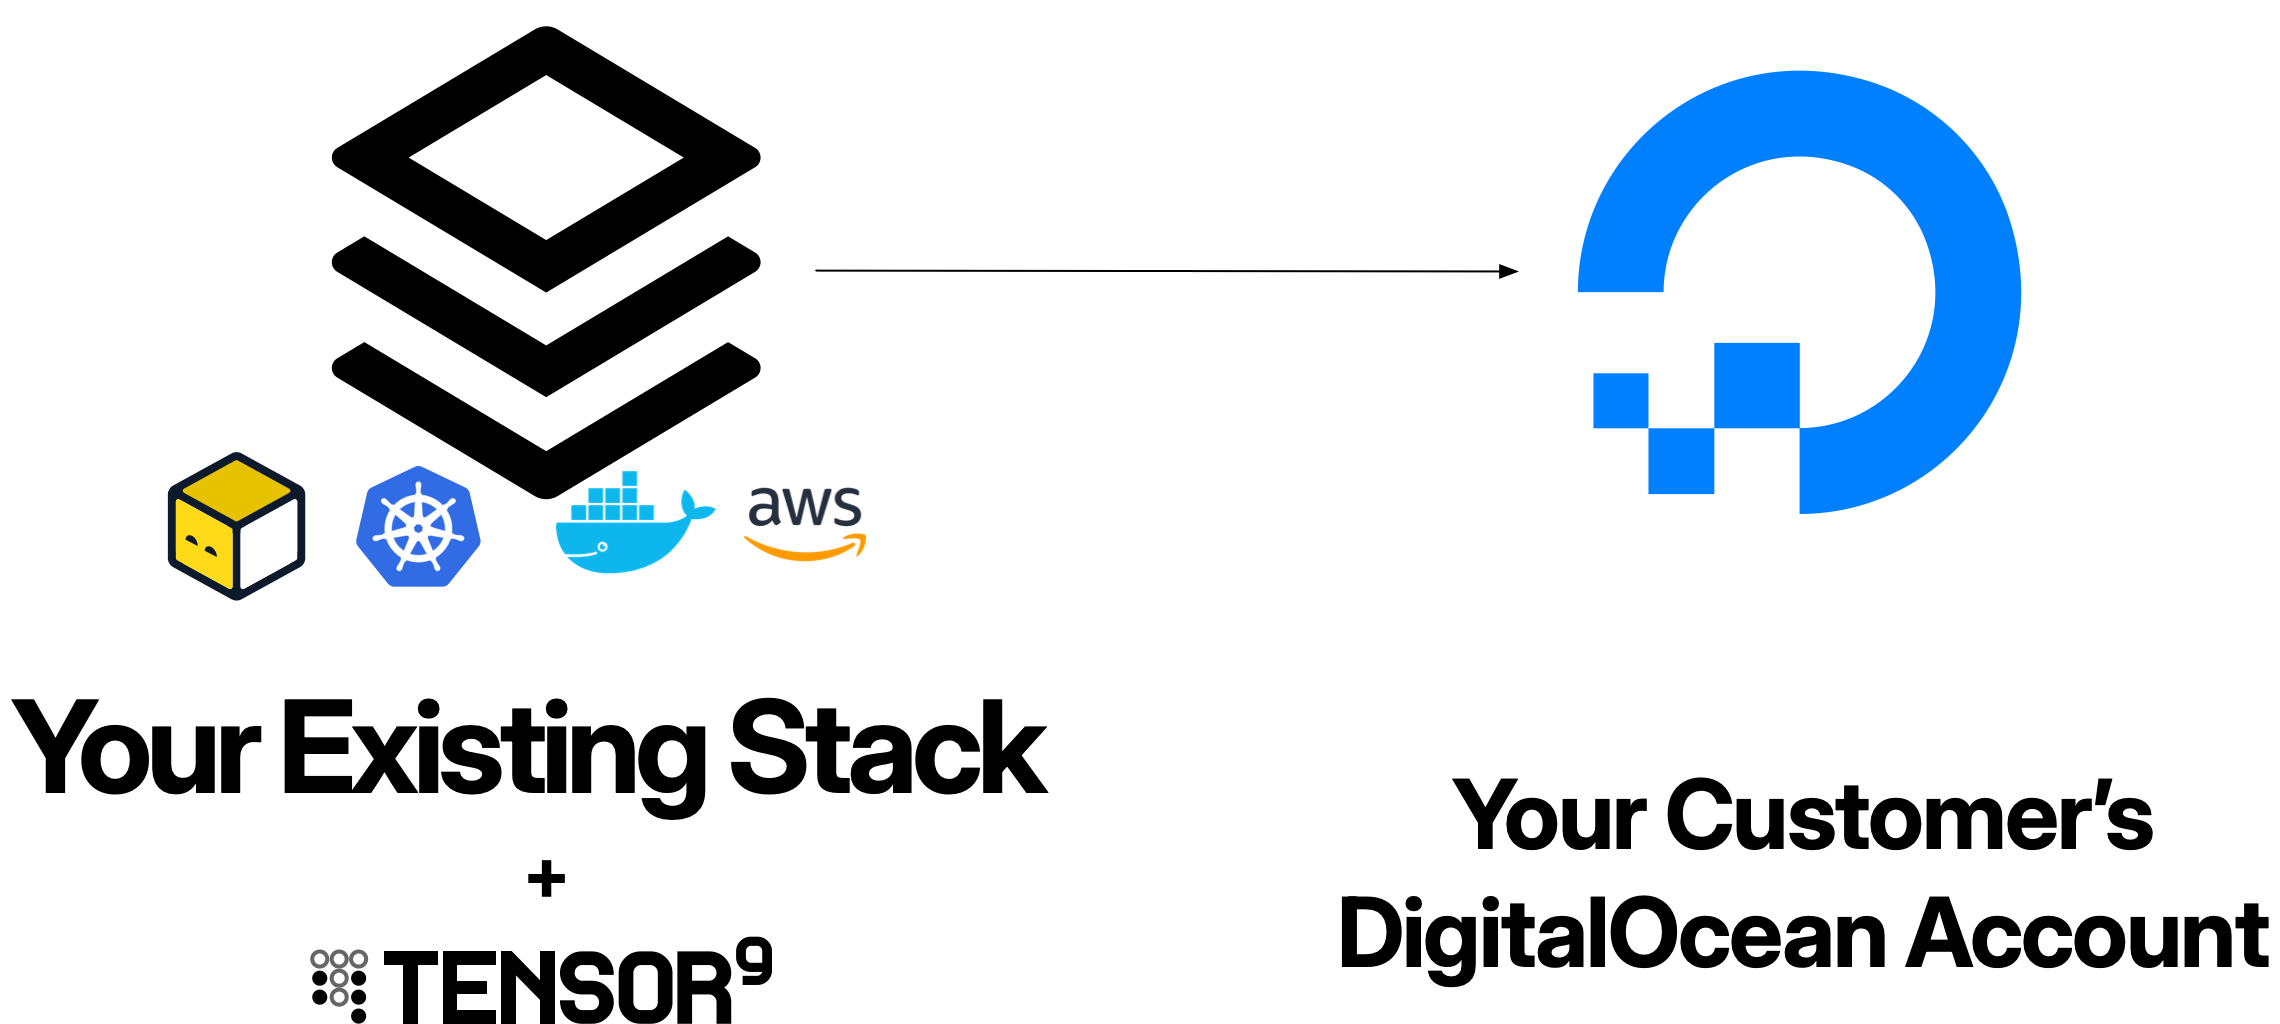
Overview
When you deploy an application to DigitalOcean customer environments using Tensor9:- Customer appliances run entirely within the customer’s DigitalOcean account
- Your control plane orchestrates deployments from your dedicated Tensor9 AWS account
- API tokens enable your control plane to manage customer appliances with customer-approved permissions
- Service equivalents compile your origin stack into DigitalOcean-native resources
Prerequisites
Before deploying appliances to DigitalOcean customer environments, ensure:Your control plane
- Dedicated AWS account for your Tensor9 control plane
- Control plane installed - See Installing Tensor9
- Origin stack published - Your application infrastructure defined and uploaded
Customer DigitalOcean account
Your customers must provide:- DigitalOcean account where the appliance will be deployed
- API tokens configured for the four-phase permissions model (Install, Steady-state, Deploy, Operate)
- Sufficient resource quotas for your application’s needs (Droplets, volumes, load balancers)
- DigitalOcean region where they want the appliance deployed
Your development environment
- doctl CLI installed and configured
- kubectl for Kubernetes operations
- Terraform or OpenTofu (if using Terraform origin stacks)
- Docker (if deploying container-based applications)
How DigitalOcean appliances work
DigitalOcean appliances are deployed on DigitalOcean Kubernetes (DOKS) with managed services orchestrated by your Tensor9 control plane.1
Customer provisions API tokens
Your customer creates four API tokens in their DigitalOcean account, each corresponding to a permission phase: Install, Steady-state, Deploy, and Operate. These tokens define what the Tensor9 controller in the appliance can do within their environment.The customer configures token scopes and expiration times to control when and how long each permission phase is active.
2
You create a release for the customer appliance
You create a release targeting the customer’s appliance:Your control plane compiles your origin stack into a deployment stack tailored for DigitalOcean, compiling any non-DigitalOcean resources to their DigitalOcean service equivalents. The deployment stack downloads to your local environment.
3
Customer grants deploy access
The customer approves the deployment by providing or activating the Deploy API token. This can be manual (sharing the token) or automated (scheduled maintenance windows).Once approved, the Tensor9 controller in the appliance can use the Deploy token to create resources in the customer’s account.
4
You deploy the release
You run the deployment locally against the downloaded deployment stack:The deployment stack is configured to route resource creation through the Tensor9 controller inside the customer’s appliance. The controller uses the Deploy API token and creates all infrastructure resources in the customer’s DigitalOcean account:
- DOKS cluster and node pools
- Managed databases (PostgreSQL, MySQL, MongoDB, Redis)
- Spaces buckets for object storage
- Load balancers
- DNS records
- Any other DigitalOcean resources defined in your origin stack
5
Steady-state observability begins
After deployment, your control plane uses the Steady-state token to continuously collect observability data (logs, metrics) from the customer’s appliance without requiring additional approvals.This data flows to your observability sink, giving you visibility into appliance health and performance.
Service equivalents
When you deploy an origin stack to DigitalOcean customer environments, Tensor9 automatically compiles resources from other cloud providers to their DigitalOcean equivalents.How service equivalents work
When compiling a deployment stack for DigitalOcean:- DigitalOcean-native resources are preserved - If your origin stack already uses DigitalOcean resources (DOKS, Managed PostgreSQL, Spaces), they remain unchanged
- AWS resources are compiled - AWS resources are converted to their DigitalOcean equivalents
- Kubernetes resources are deployed - Most compute workloads run on DOKS (DigitalOcean Kubernetes)
- Configuration is adjusted - Resource configurations are modified to match DigitalOcean conventions
Common service equivalents
| Service Category | AWS | DigitalOcean Equivalent |
|---|---|---|
| Containers | EKS | DOKS (DigitalOcean Kubernetes) |
| ECS Fargate | DOKS with containerized workloads | |
| Functions | Lambda | DigitalOcean Functions, Knative on DOKS |
| Storage | S3 | Spaces (S3-compatible) |
| EBS | Block Storage (volumes) | |
| Database | RDS PostgreSQL | Managed PostgreSQL |
| RDS Aurora MySQL, RDS MySQL | Managed MySQL | |
| DocumentDB | Managed MongoDB | |
| ElastiCache Redis | Managed Redis | |
| Networking | VPC | VPC (DigitalOcean VPC) |
| ALB/NLB | Load Balancer | |
| Route 53 | DigitalOcean DNS |
Some popular AWS services (EC2, DynamoDB, EFS) are not currently supported. See Unsupported AWS services for the full list and recommended alternatives.
Example: Compiling an AWS origin stack
If your origin stack defines a Lambda function:Permissions model
DigitalOcean appliances use a four-phase API token permissions model that balances operational capability with customer control.The four permission phases
| Phase | API Token Scope | Purpose | Access Pattern |
|---|---|---|---|
| Install | Read/Write (all resources) | Initial setup, major infrastructure changes | Customer-approved, rare |
| Steady-state | Read-only (observability) | Continuous observability collection | Active by default |
| Deploy | Read/Write (scoped to appliance) | Deployments, updates, configuration changes | Customer-approved, time-bounded |
| Operate | Read/Write (scoped operations) | Remote operations, troubleshooting, debugging | Customer-approved, time-bounded |
API token structure
Each token is created in the customer’s DigitalOcean account with specific scopes and expiration times. Example: Deploy token configuration- The token is provided to the controller
- The token has not expired
- The customer has not revoked it
- Can read observability data from resources tagged with the appliance’s
instance-id - Cannot modify, delete, or create any resources
- Allows continuous monitoring without customer intervention
Deployment workflow with API tokens
1
Customer grants deploy access
Customer approves a deployment by providing the Deploy API token to the Tensor9 controller. This can be done via the Tensor9 UI, CLI, or automated workflows.
2
You execute deployment locally
You run the deployment locally against the downloaded deployment stack:The deployment stack is configured to route resource creation through the Tensor9 controller in the appliance.
3
Controller uses Deploy token and creates resources
For each resource Terraform attempts to create, the Tensor9 controller inside the appliance uses the Deploy API token and creates the resource in the customer’s account.All infrastructure changes occur within the customer’s account using their Deploy token permissions.
4
Deploy access expires
After the token expires or is revoked, the Deploy token can no longer be used. Your control plane automatically reverts to using only the Steady-state token for observability.
Networking
DigitalOcean appliances use DigitalOcean VPC for network isolation and DigitalOcean Kubernetes (DOKS) for compute.Tensor9 controller on DOKS
When an appliance is deployed, Tensor9 creates a dedicated DOKS cluster containing the Tensor9 controller. The controller:- Communicates outbound to your Tensor9 control plane over HTTPS
- Manages appliance resources using the customer’s API tokens
- Forwards observability data to your observability sink
- Does not accept inbound connections - all communication is outbound-only
Application infrastructure
Your application resources run on their own DOKS cluster or use managed services, completely separate from the Tensor9 controller infrastructure. The application infrastructure is defined entirely by your origin stack. Example: Application DOKS cluster with load balancerResource naming and tagging
All DigitalOcean resources should use theinstance_id variable to ensure uniqueness across multiple customer appliances.
Parameterization pattern
Required tags
DigitalOcean uses string-based tags (not key-value pairs like AWS/GCP) for most resources. Tag all resources withinstance-id to enable observability and resource discovery:
For most resources (Droplets, DOKS, Databases, Load Balancers, Volumes):
DigitalOcean tags are simple strings (e.g.,
"instance-id:000000007e") for most resources, unlike AWS/Google Cloud which use key-value pairs. Spaces buckets are an exception and support key-value tags. When filtering or querying resources, use the full string tag format.instance-id tag:
- Allows filtering of observability data by appliance
- Helps customers track costs per appliance
- Facilitates resource discovery by Tensor9 controllers
Observability
DigitalOcean appliances provide observability through DigitalOcean Monitoring, DOKS logging, and integration with your observability sink.DigitalOcean Monitoring
Infrastructure metrics are automatically collected for:- Droplets: CPU utilization, memory usage, disk I/O, network traffic
- DOKS: Node CPU/memory, pod counts, cluster health
- Managed Databases: Connections, queries per second, replication lag
- Load Balancers: Request counts, response times, connection counts
- Spaces: Storage used, request counts
DOKS logging
Application logs from containers running on DOKS are collected and forwarded:Database query logs
Managed database query logs can be enabled and forwarded:Artifacts
DigitalOcean appliances automatically provision private container registries to store container images deployed by your deployment stacks.Container images (DigitalOcean Container Registry)
When you deploy an appliance, Tensor9 automatically provisions a private container registry in the customer’s DigitalOcean account. Example: Origin stack with DOKS deployment Your origin stack references container images from your vendor registry:- Detects the container image reference in your Kubernetes manifests
- Provisions a private container registry in the appliance
- Copies the container image from your vendor registry to the appliance’s private registry
- Rewrites the deployment stack to reference the appliance-local registry
- Deploy (tofu apply): Tensor9 copies the container image from your vendor registry to the appliance’s private registry
- Destroy (tofu destroy): Deleting the deployment stack also deletes the copied container artifact from the appliance’s private registry
Secrets management
Store secrets in AWS Secrets Manager or AWS Systems Manager Parameter Store in your AWS origin stack, then pass them to your application as environment variables.Secret naming and injection
Always use parameterized secret names and inject them as environment variables:If your application dynamically fetches secrets using AWS SDK calls (e.g.,
boto3.client('secretsmanager').get_secret_value()), those calls will NOT be automatically mapped by Tensor9. Always pass secrets as environment variables.Operations
Perform remote operations on DigitalOcean appliances using the Operate token.kubectl on DOKS
Execute kubectl commands against DOKS clusters:doctl CLI operations
Execute doctl commands:Database queries
Execute SQL queries against managed databases:Example: Complete DigitalOcean appliance
Here’s a complete example of a deployment stack for a DigitalOcean appliance, compiled from an AWS origin stack:main.tf
variables.tf
outputs.tf
Best practices
Use instance_id for all resource names
Use instance_id for all resource names
Every DigitalOcean resource with a name should include
${var.instance_id} to prevent conflicts across customer appliances:Tag all resources with instance-id
Tag all resources with instance-id
Apply the This enables:
instance-id tag to every resource. DigitalOcean uses string tags for most resources:- Observability data filtering
- Cost tracking
- Resource discovery
Use EKS, ECS Fargate, or Lambda in your AWS origin stack
Use EKS, ECS Fargate, or Lambda in your AWS origin stack
For compute workloads in your AWS origin stack, prefer managed container and serverless services over EC2 instances. These compile cleanly to DigitalOcean Kubernetes (DOKS) and Functions:These AWS resources automatically compile to appropriate DigitalOcean equivalents (DOKS, Functions) when deployed to DigitalOcean customer environments.
Use AWS Secrets Manager for sensitive data
Use AWS Secrets Manager for sensitive data
Never hardcode secrets. Use AWS Secrets Manager or SSM Parameter Store with parameterized names in your AWS origin stack:Pass secrets to your application as environment variables. Runtime SDK calls to fetch secrets are not automatically mapped by Tensor9.
Troubleshooting
Deployment fails with API token errors
Deployment fails with API token errors
Symptom: Terraform apply fails with “unauthorized” or “forbidden” errors.Solutions:
- Verify the Tensor9 controller has the correct Deploy API token
- Check that the token has the necessary scopes (kubernetes:write, database:write, etc.)
- Ensure the token has not expired
- Verify the token has not been revoked
- Check DigitalOcean account is not suspended or has billing issues
Resources fail to create due to naming conflicts
Resources fail to create due to naming conflicts
Symptom: “Name already in use” or “Resource already exists” errors.Solutions:
- Ensure all resource names include
${var.instance_id} - Verify the
instance_idvariable is being passed correctly - Check that no hardcoded resource names exist in your origin stack
- For Spaces buckets, remember they must be regionally unique
Observability data not flowing to control plane
Observability data not flowing to control plane
Symptom: Metrics and logs aren’t appearing in your observability sink.Solutions:
- Verify the Steady-state token has monitoring:read scope
- Check that all resources are tagged with
instance-id - Ensure DOKS logging is enabled
- Verify the control plane can authenticate with the Steady-state token
- Check network connectivity between appliance and control plane
Resource quota limits exceeded
Resource quota limits exceeded
Symptom: “Quota exceeded” or “Droplet limit reached” errors.Solutions:
- Ask the customer to request quota increases from DigitalOcean support
- Consider using smaller droplet sizes
- Review and clean up unused resources in the customer’s account
- Deploy across multiple DigitalOcean regions
DOKS cluster creation fails
DOKS cluster creation fails
Symptom: Kubernetes cluster creation times out or fails.Solutions:
- Verify the region supports DOKS
- Check that the Kubernetes version is supported
- Ensure the node pool size is available in the region
- Verify VPC configuration is correct
- Check DigitalOcean status page for service incidents
Need help?
Need help?
If you’re experiencing issues not covered here or need additional assistance with DigitalOcean deployments, we’re here to help:
- Slack: Join our community Slack workspace for real-time support
- Email: Contact us at [email protected]
Next steps
Now that you understand deploying to DigitalOcean customer environments, explore these related topics:- Permissions Model: Deep dive into the four-phase permissions model
- Deployments: Learn how to create releases and deploy to customer appliances
- Operations: Execute remote operations on DigitalOcean appliances
- Observability: Set up comprehensive monitoring and logging
- Terraform Origin Stacks: Write Terraform origin stacks optimized for DigitalOcean