Deploying Into Someone Else’s Cloud Without Asking for Their Keys

When you deliver software into a customer’s cloud, the install experience is the first real interaction they have with your product. If it’s painful, you’ve lost trust before anything even runs.
Before you can deploy your application into a customer’s environment, that environment needs to be prepared: infrastructure provisioned, networking configured, secrets created, DNS set up. Tensor9 figures out what’s needed by analyzing your application stack and the deployment shape (what we call a form factor), then guides your customer through getting their environment ready. This post walks through what that experience looks like, the decisions we made along the way, and how it all fits together.
The Problem
Enterprise software that runs in a customer’s cloud has three tensions pulling against each other:
- The customer needs to stay in control. It’s their cloud, their credentials, their compliance posture. They can’t just hand over the keys.
- The setup can’t require deep expertise. The customer shouldn’t need to reverse-engineer your architecture to get the environment ready.
- You need to keep control of deployment. You have your own release process, your own CI/CD, your own deployment tooling. The install flow shouldn’t force you to change how you ship software.
Most approaches sacrifice at least one of these:
- “Give us your credentials.” Hand over your AWS keys and we’ll set everything up. Fast for the vendor, but terrifying for the customer. Their credentials leave their environment and end up on someone else’s infrastructure.
- “Here’s a 40-page runbook.” Follow these steps precisely, in order, with no mistakes. The vendor’s hands are clean, but the customer is left alone with a pile of YAML.
- “Use our deployment platform.” Some tools solve the customer experience but take over the vendor’s release process entirely. The vendor loses the ability to deploy on their own terms, with their own tooling.
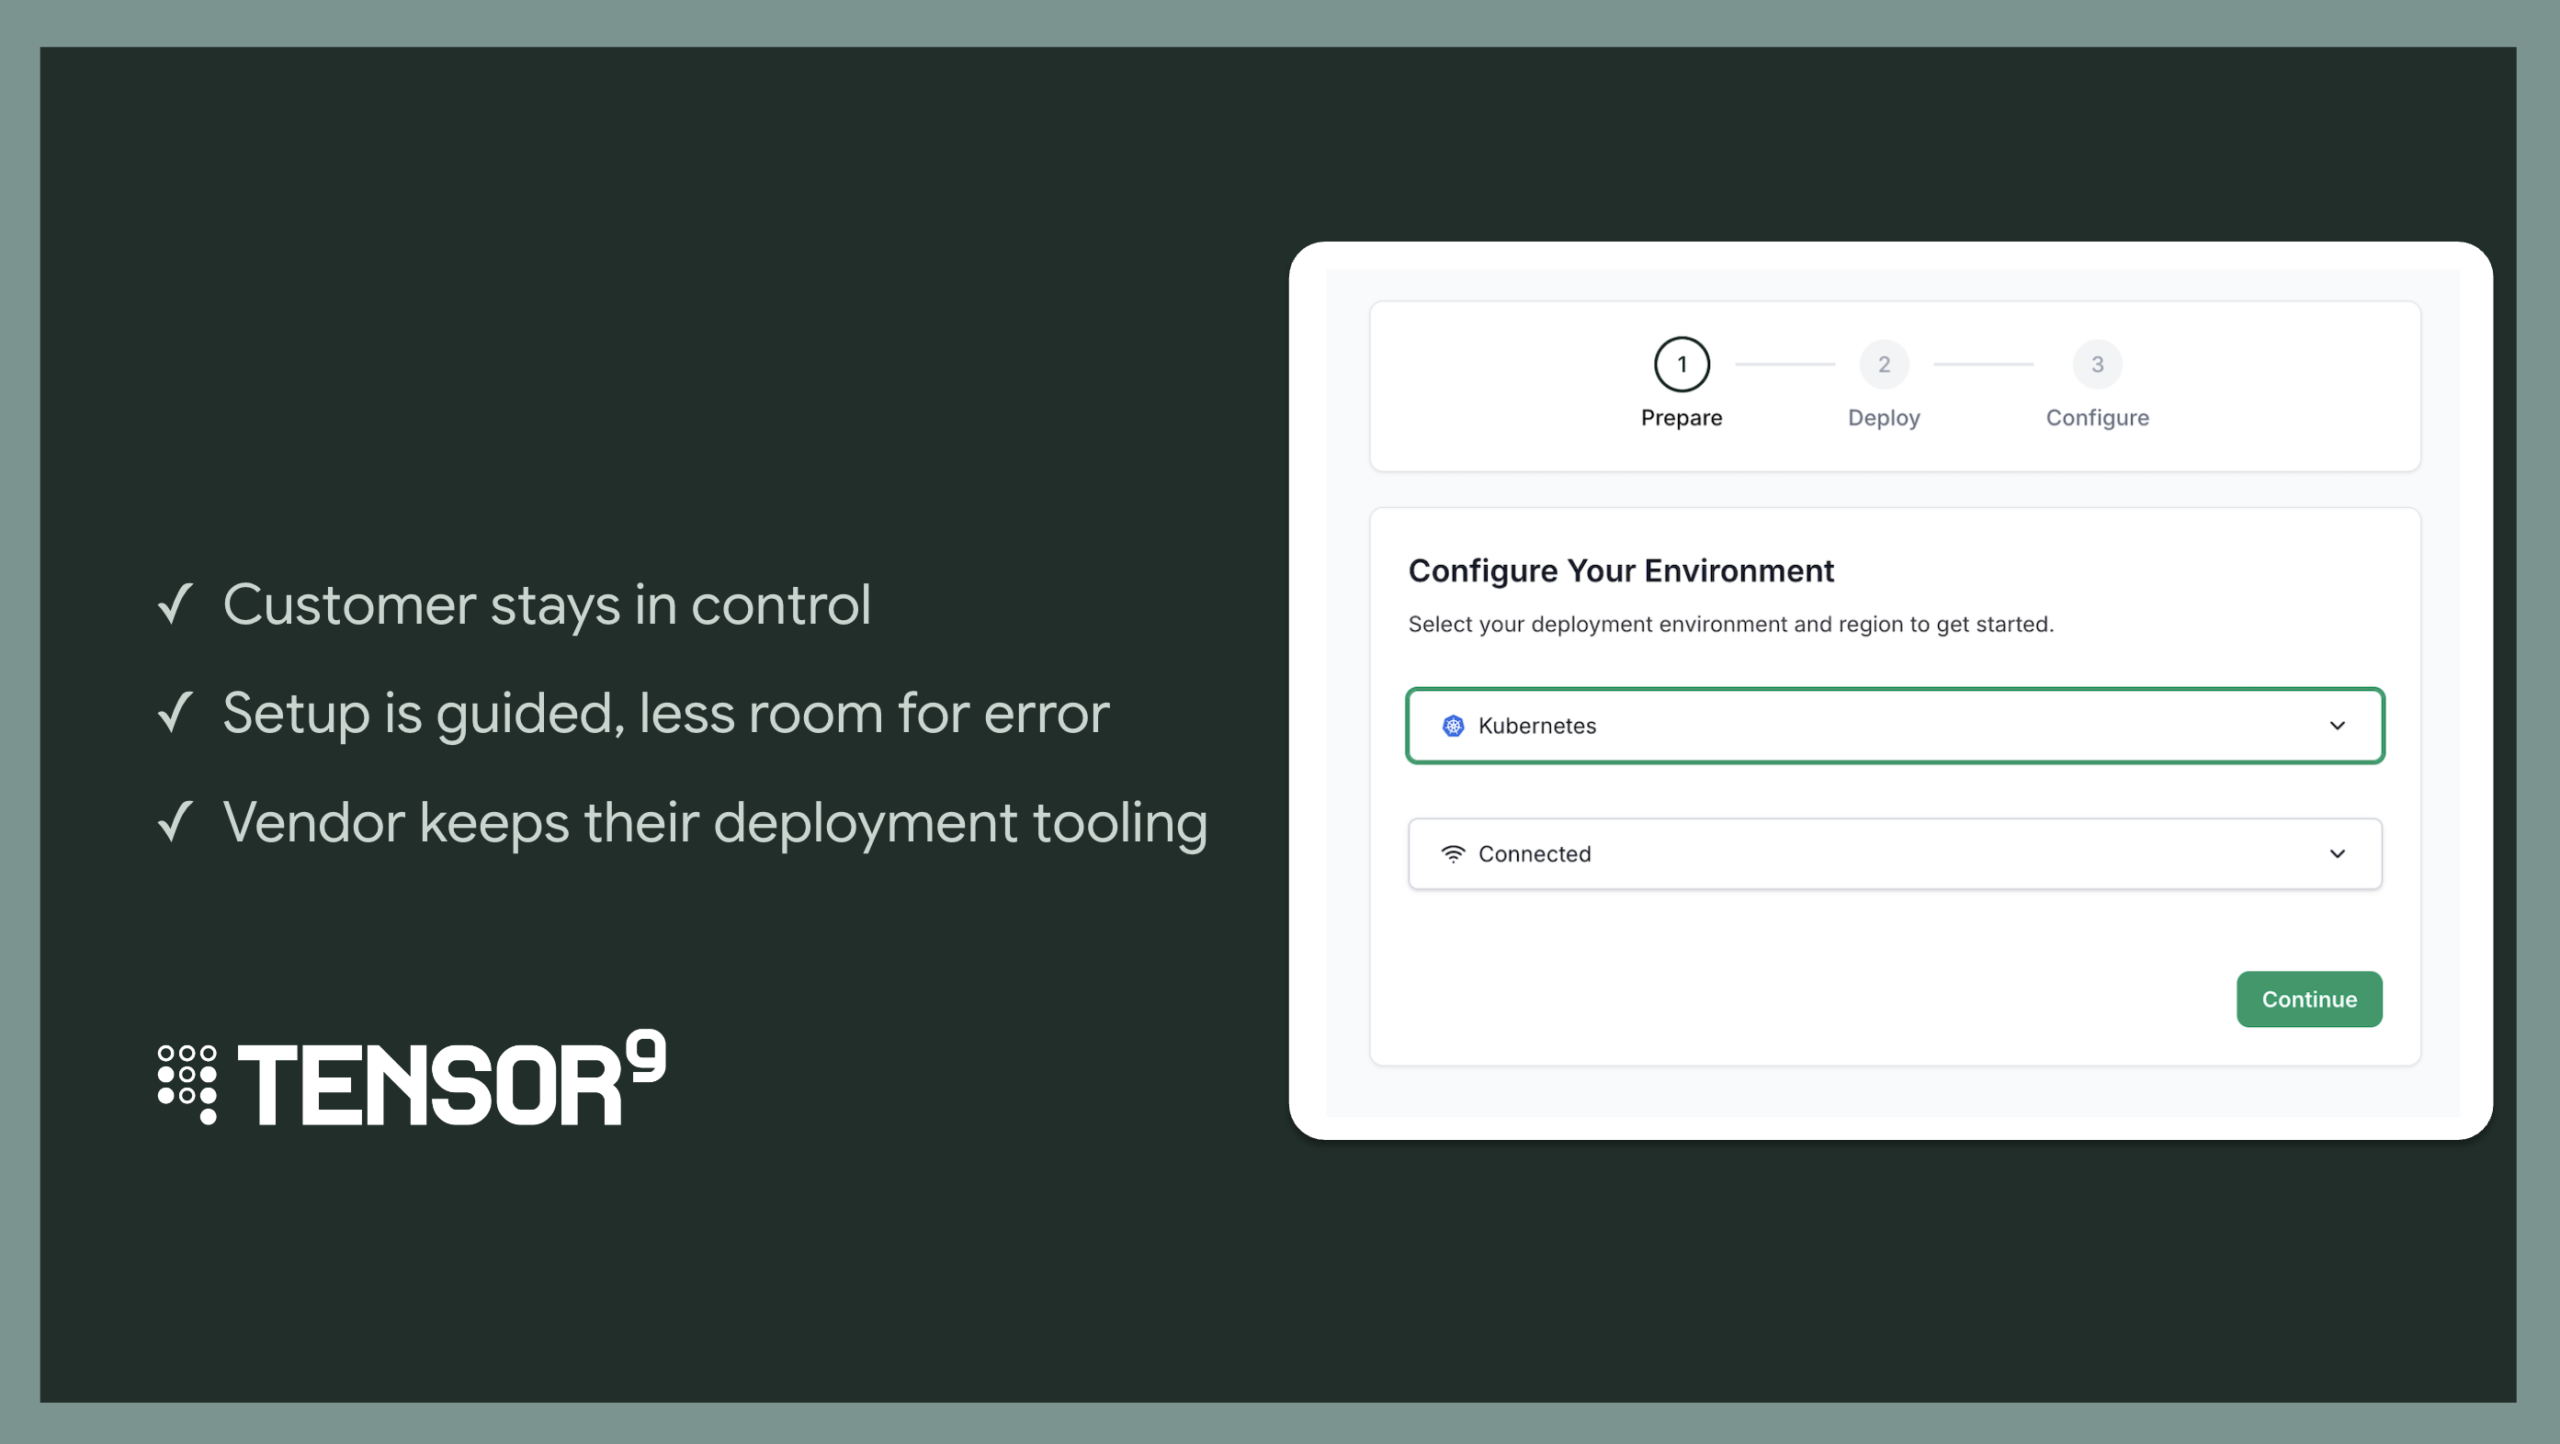
We wanted all three: the customer stays in control of their credentials, the setup process is guided and hard to get wrong, and you (the vendor) keep full control of how and when you deploy.
The Design: Separation of Concerns
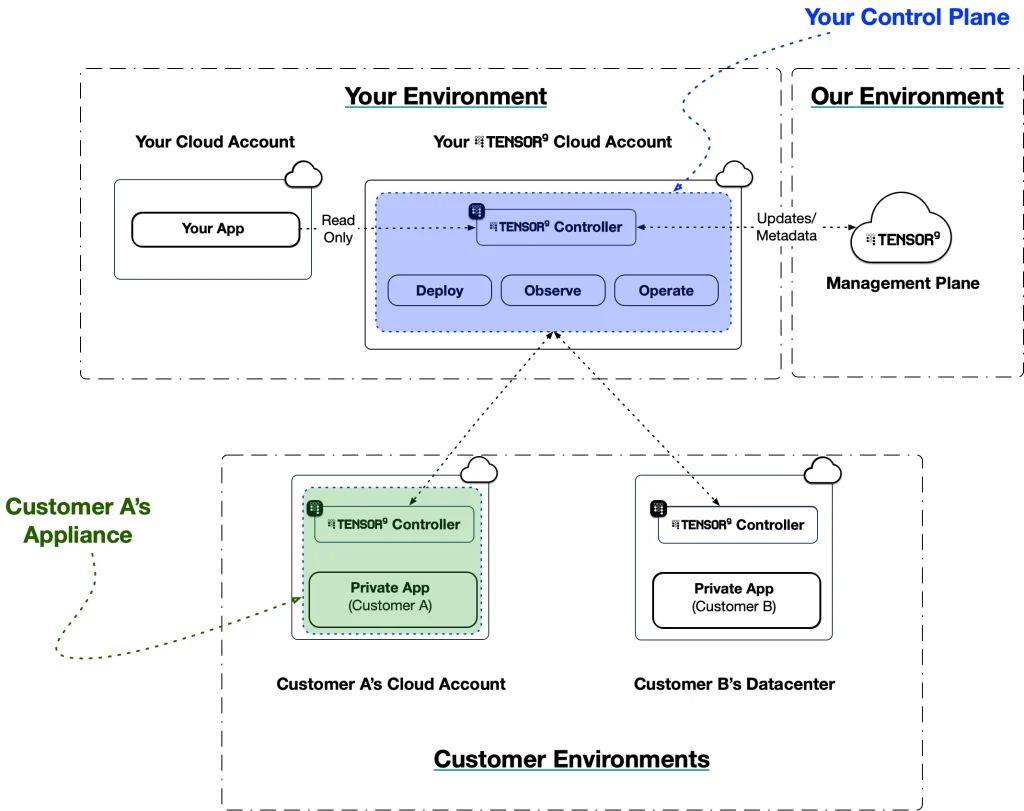
The whole install flow runs from a single UI on your infrastructure. Your customer walks through environment selection, Terraform generation, DNS, service configuration, and secrets all in one guided experience. But the UI never touches their credentials. The core design decision is about where things happen.
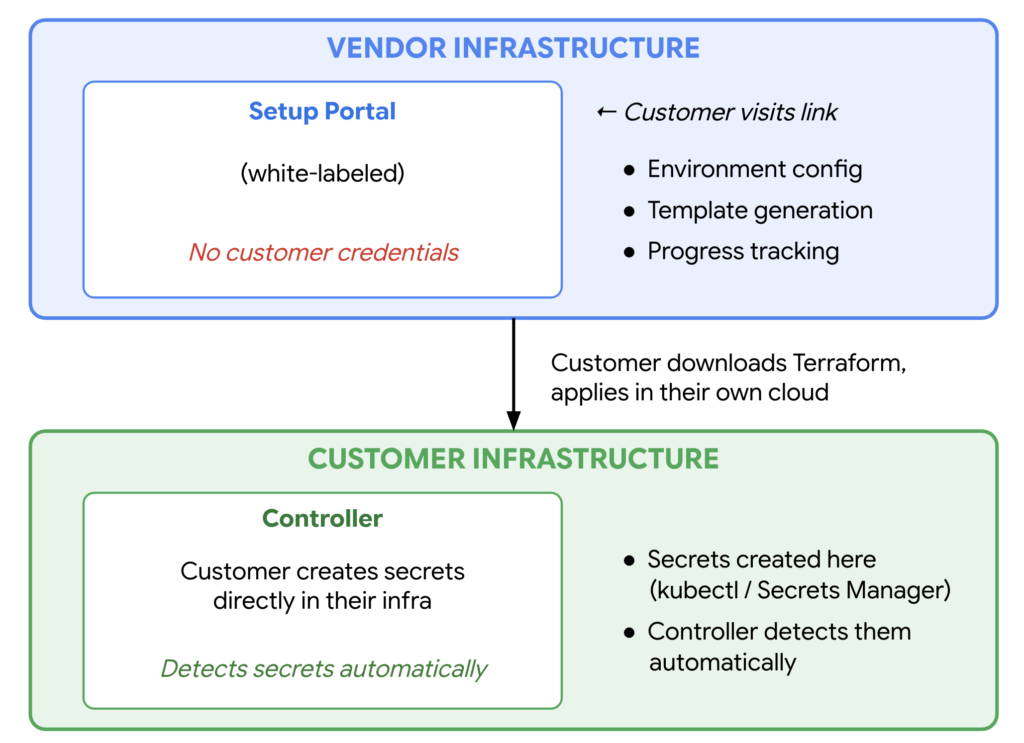
The UI handles guidance: what environment to pick, what Terraform to download, what secrets are needed, what’s still missing. Your customer’s credentials never touch it.
The customer’s infrastructure handles execution: they apply Terraform in their own cloud, create secrets in their own cluster or secret manager, and the controller (running in their environment) picks everything up automatically. This keeps you completely out of the credential loop.
UI vs. CLI
We built a browser-based flow instead of a CLI-only experience. The person running the install might be a platform engineer, a DevOps lead, or an IT admin. A guided UI reduces errors and makes the experience accessible to a wider range of people.
We also support a headless CLI mode for CI/CD pipelines, automated testing, and customers who prefer the terminal. The UI is the default; the CLI is the escape hatch.
The UI is white-labeled with your branding (logo, name, colors). From your customer’s perspective, they’re interacting with your install experience, not Tensor9.
Setup
The flow starts with a link. You generate a setup URL and share it with your customer. You control which form factors (cloud environments, regions, install methods) are available. You can offer a single form factor or let the customer choose from a curated set. When your customer opens the link, they walk through a number of decisions based on what you’ve made available.
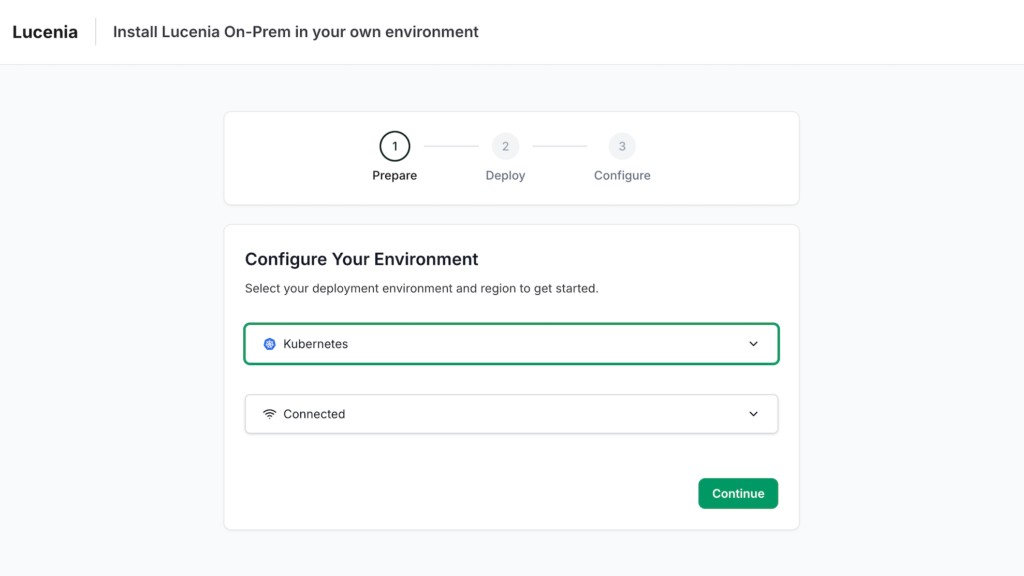
Step 1: Pick the Environment
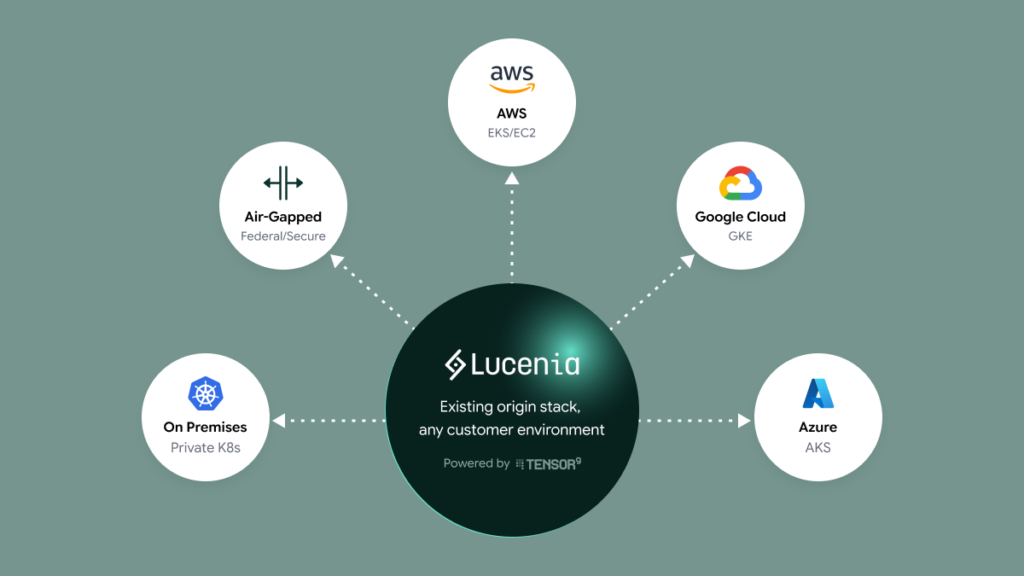
The first screen asks where they want to deploy. Today we support AWS and Kubernetes, with GCP and Azure support coming soon. The UI adapts depending on what they pick.
For VM-based clouds (AWS, and soon GCP and Azure), we show a region selector. For Kubernetes, we ask about cluster mode instead (dedicated cluster or shared namespace).
Step 2: Pick the Install Method
Next, your customer picks how they want to install. Right now that’s Terraform for all environments, with Helm support coming soon for Kubernetes.
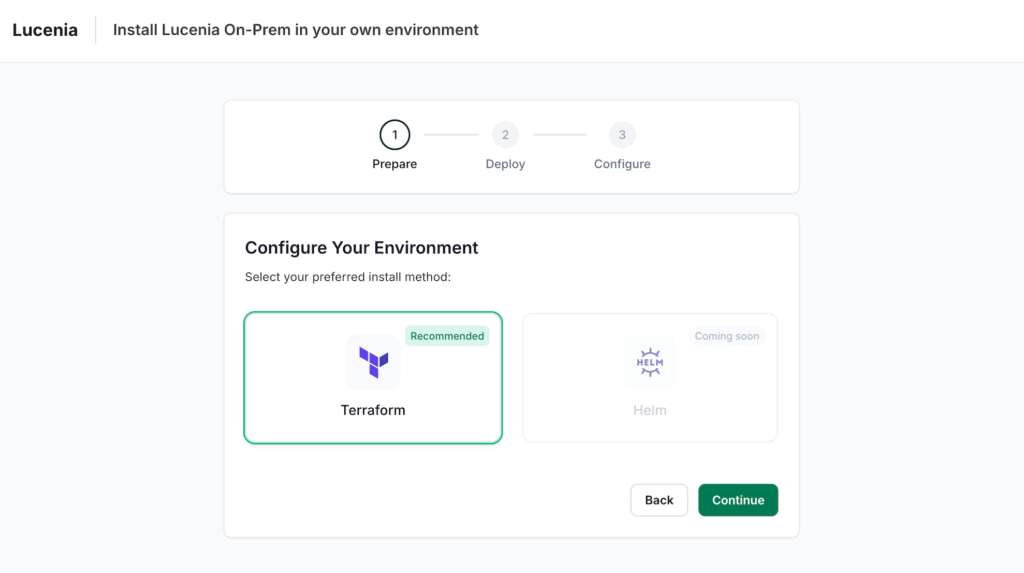
Why Terraform? Nearly every enterprise team that manages cloud infrastructure knows Terraform. By generating standard .tf files, we meet customers where they are. They can review what will be created, understand it, and fold it into their existing IaC workflow if they want.
Step 3: Download and Apply
The system generates a Terraform configuration based on what your application needs in your customer’s chosen environment, and presents it for download. Your customer runs terraform init and terraform apply, and the portal auto-advances when it detects the apply has completed (via a callback baked into the Terraform config).
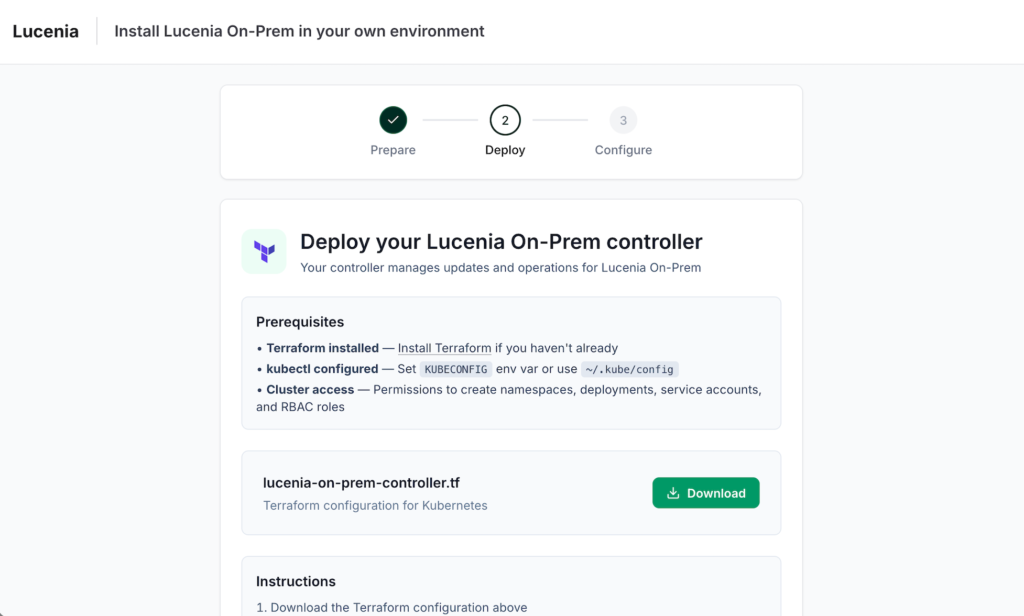
For VM-based clouds, this is two phases: first infrastructure (VPC, subnets, IAM), then the controller instance. Each phase has its own Terraform file, and the UI guides the customer through both downloads in sequence.
Configuration
Once the Terraform applies finish and the controller boots, the flow moves to configuration. Your customer never enters sensitive data into the UI. Instead, it tells them what’s needed, and they create secrets directly in their own infrastructure.
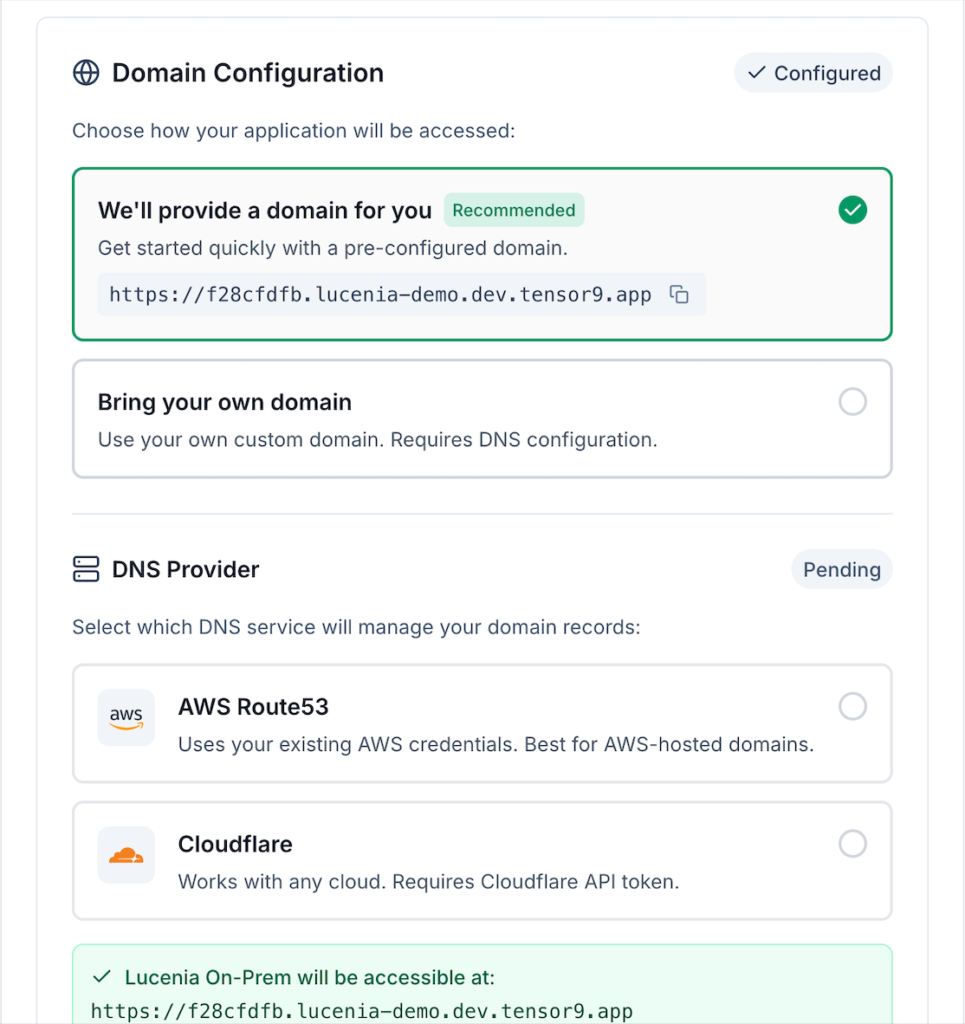
DNS Configuration
The first step is DNS. Customers choose between a vendor-provided domain and a custom domain, and pick their DNS provider (Route 53, Cloudflare). Zone creation happens automatically from there.
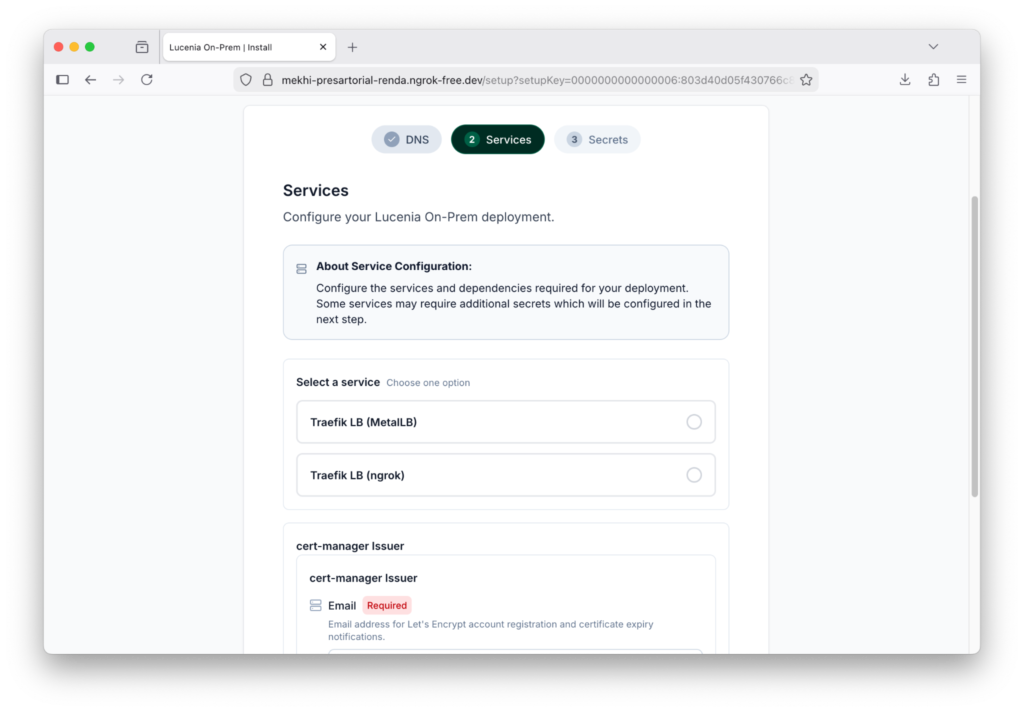
Service Configuration
If your app needs customer-specific service choices (say, choosing between managed Postgres and self-hosted Postgres, or picking a monitoring provider), those selections happen here. What your customer sees is driven by your app definition and the form factor you chose. The UI renders configuration fields dynamically based on what’s relevant for that combination.
You define what you need (“I need a relational database”), and your customer sees the concrete options available in their environment. The controller handles the mapping.
Secrets
The last step is secrets. Your app declares which credentials your customer must provide (a license key to run your software, initial passwords, etc.). The UI shows the list of required secrets, their status, and gives your customer the commands to create them directly in their own infrastructure.
For Kubernetes deployments, the UI generates ready-to-run kubectl commands:
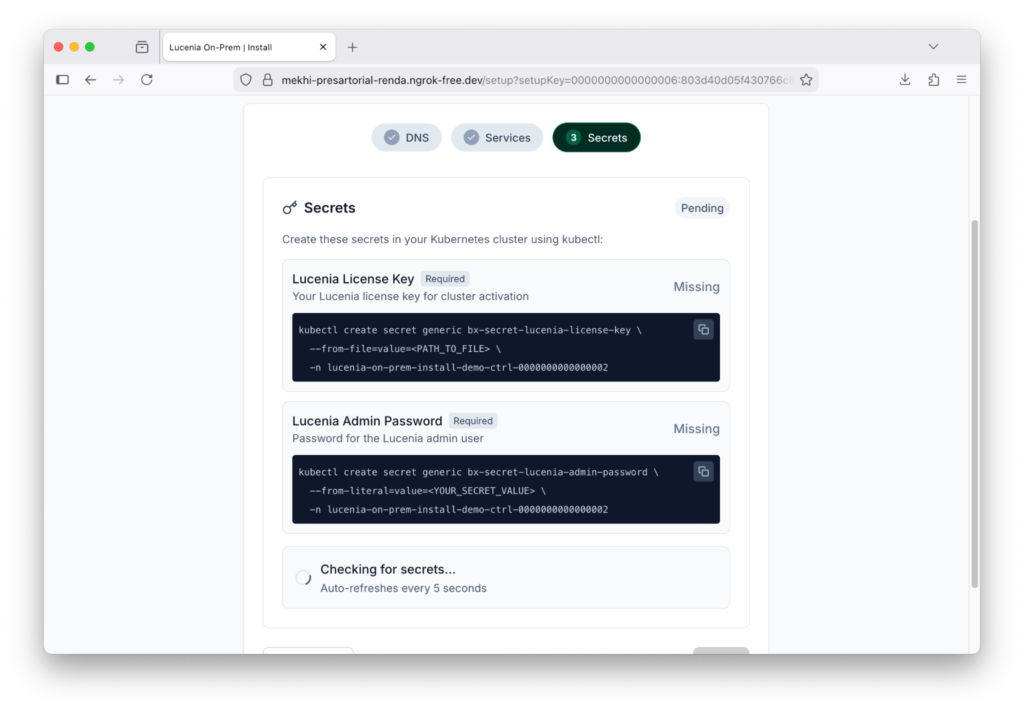
For AWS deployments, it shows the expected secret name in AWS Secrets Manager instead of a kubectl command. Either way, the pattern is the same: your customer creates the secret in their own infrastructure, and the controller detects it automatically.
Your customer’s secret values never pass through your portal. They go straight from their terminal (or secret manager console) into their own cluster or cloud account. The portal just polls and shows green checkmarks as secrets appear. Optional secrets can be skipped.
The Progress Model
Throughout the whole flow, we track progress across five phases.
The status banner shows where things stand. Completed phases get a green checkmark, the active phase pulses, future phases are grayed out. Both your customer and you get a clear picture of progress without seeing the internal state machine.
After setup finishes, your customer lands on an Install Overview page. It’s a single place to see what got deployed and manage ongoing configuration.
Then You Deploy
At this point your customer’s environment is ready: infrastructure is provisioned, the controller is running, DNS is configured, services are selected, and secrets are in place.
Now you deploy. Tensor9 compiles your application stack for your customer’s form factor, maps services to the target environment (a PostgreSQL database in your stack might become an RDS instance in your customer’s AWS account), and generates the application Terraform. The controller, already running in your customer’s environment, executes terraform apply to deploy the application and its infrastructure.
Your customer doesn’t need to do anything for this step. You submit a release and perform a deployment.
This is the handoff that makes the whole flow work: your customer prepares the environment, you deploy into it. Each side does what they’re best at, and neither needs the other’s credentials.
Design Decisions
Four principles shaped every decision in this flow:
Security is a foundation, not a feature. Customer credentials never touch vendor infrastructure. Secrets go from the customer’s terminal into their own cluster or cloud account. The vendor portal just shows status.
Guided doesn’t mean rigid. We infer what the customer’s environment needs from your application stack and form factor, so the customer never has to guess. We default to Terraform, a browser UI, and standard secret management tools. But every decision has an escape hatch. You control which options are available, the customer picks from those options, and both sides stay in control.
Meet customers where they are. Terraform, not a custom tool. A browser UI, not just a CLI. Secret references, not just direct entry. The install flow is the customer’s first experience with your product. Respecting their existing tools and workflows matters.
Transparency builds trust. We list exactly what the Terraform creates. We show every service and dependency that gets provisioned. The install experience carries your brand, not ours. Customers can review the plan before applying. When the first interaction with your product is honest about what it’s doing, everything that follows starts on better footing.
Ready to see the install experience for your app?
Every vendor’s install flow looks a little different depending on your app, your services, and the form factors your support. If you want to see what yours would look like, reach out and we’ll show you a demo with your product and choices.